At a glance
Symptoms
- • Oven consistently runs 20-50 degrees hotter or cooler than the set temperature.
- • Baked goods are consistently undercooked or burnt on the outside and raw inside.
- • The oven control board displays an error code related to the RTD (Resistance Temperature Detector) sensor (e.g., F3, F4, C-21, or F30).
- • The oven takes an unusually long time to preheat or fails to reach the target temperature.
- • The sensor probe inside the oven shows visible signs of damage, burning, or cracking.
- • The oven shuts off randomly during the preheat cycle.
Common causes
- • A failed sensor sends incorrect resistance readings to the control board, ruining your baking precision.
- • Ignoring a drifting sensor can lead to wasted food and frustrating holiday meals.
- • A shorted sensor can occasionally cause the oven to overheat dangerously, risking damage to surrounding cabinetry.
- • Prolonged extreme temperature fluctuations can prematurely wear out your bake and broil elements.
- • Excessive use of the high-heat self-cleaning cycle degrades the sensor's internal wiring over time.
Safety First — Read Before You Start
- •Always disconnect power at the breaker panel or unplug the oven before starting. 240V power can be lethal.
- •If working on a gas oven, do not disturb the gas supply line. If you smell gas at any point, stop and call a professional.
- •Let the oven cool completely before reaching inside; the cavity and racks retain heat for hours.
- •Watch out for sharp sheet metal edges on the back panel if you need to pull the oven out.
- •Never bypass the temperature sensor to force the oven to heat; this removes a critical safety limit and can cause a fire.
Tools & supplies you'll need
- Digital Multimeter (capable of measuring Ohms/Resistance)
- 1/4-inch or 5/16-inch nut driver (depending on brand)
- Phillips-head screwdriver
- Work gloves (to protect against sharp sheet metal)
- Flashlight or headlamp
- Needle-nose pliers
- Binder clip or clothespin (to secure the wire harness)
Step-by-step instructions
Disconnect Power and Prep the Area
Safety is always the first priority. For electric ranges, unplug the heavy 240V power cord from the wall. If you have a built-in wall oven or a hardwired unit, locate your home's main electrical panel and flip the double-pole breaker supplying power to the oven. Verify the power is off by attempting to turn on the oven light or the clock display. If you need to pull a freestanding range away from the wall to access the back, do so carefully. In earthquake-prone areas like California, your range should be secured by an anti-tip bracket mounted to the floor; you'll need to slide the range straight forward to disengage it. Lay down a piece of cardboard to protect your kitchen floors from scratches.
Tip: Slide a piece of cardboard or hardboard under the front legs of the range before pulling it out to protect your hardwood or linoleum floors from deep gouges.
⚠ Warning: Never assume the power is off just because the display is blank. Always double-check by pressing buttons on the control panel. 240 volts is unforgiving.
Locate the Temperature Sensor
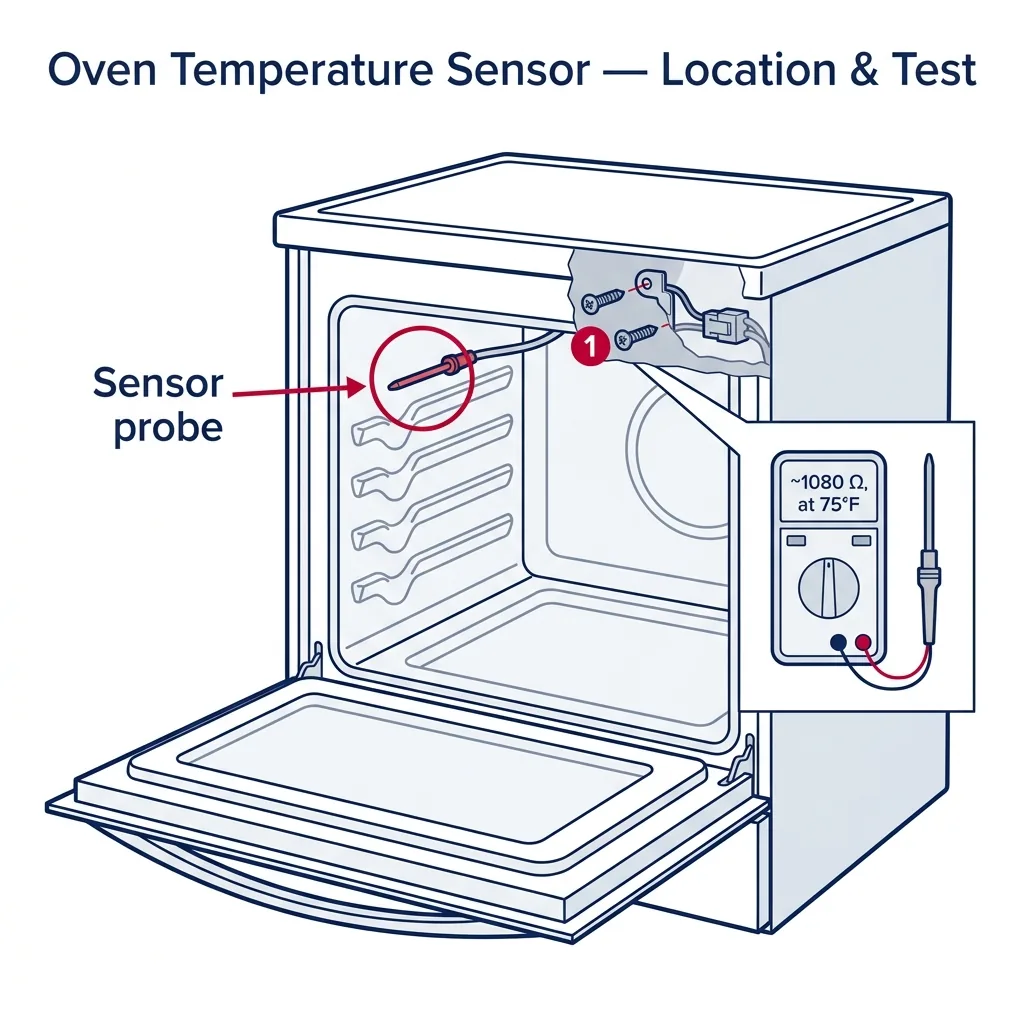
Open the oven door and look inside the cavity. The temperature sensor is a thin, metal wand—usually about 3 to 4 inches long and a quarter-inch thick. It is almost always located protruding from the rear wall of the oven, near the top right or top left corner. It sits on a small metal mounting plate secured by one or two screws. Use a flashlight to get a clear view of the mounting plate and determine what type of tool you need to remove it (typically a 1/4-inch hex head or a Phillips screw).
Tip: If your oven has racks that are in the way, remove them completely to give yourself plenty of room to work without awkwardly contorting your arms.
Remove the Sensor Mounting Screws
Using your nut driver or screwdriver, carefully extract the screws holding the sensor's mounting plate to the back wall of the oven. Keep a firm grip on the sensor as you remove the last screw so it doesn't fall. Once the screws are out, gently pull the sensor straight out toward you. Attached to the back of the sensor will be a wire harness. Pull it out slowly and carefully—you only want to expose the plastic connection plug. Do not yank it roughly, as the wires inside the oven wall can be fragile.
⚠ Warning: CRITICAL STEP: Do not let the wire harness slip back through the hole into the rear oven insulation! If it falls back in, you will have to pull the entire oven out and remove the rear sheet metal panel to retrieve it.
Secure the Wire and Disconnect the Harness
As soon as you pull the plastic connector plug through the hole into the oven cavity, clip a binder clip or a clothespin onto the wires behind the plug. This acts as a physical stop, preventing the harness from retracting into the back wall of the oven while you work. Once secured, use your hands (or needle-nose pliers if the clip is stubborn) to depress the locking tab on the plastic Molex connector. Wiggle the connector back and forth to separate the old sensor from the oven's main wiring harness. Set the old sensor aside on your counter.
Tip: If the connector is coated in a sticky residue from years of roasting, a quick wipe with rubbing alcohol can make it less slippery and easier to unclip.
Test the Old Sensor with a Multimeter
Before throwing the old part away, verify it is actually defective. Set your digital multimeter to the Ohms (Ω) setting, specifically the 2k or 2000 Ohm range if your meter is not auto-ranging. Touch the red and black multimeter probes to the two metal prongs inside the connector of the old sensor. At room temperature (around 75°F or 24°C), a standard RTD oven sensor should read approximately 1080 to 1100 Ohms. If the reading is 'OL' (open loop/infinite resistance), zero (shorted), or wildly out of range (like 800 Ohms or 1500 Ohms), the sensor has failed and must be replaced. A drifting sensor is the number one cause of ruined baking times.
Tip: The resistance of an RTD sensor changes by about 2 Ohms for every 1 degree Fahrenheit. So if your kitchen is chilly (65°F), expect a reading closer to 1060 Ohms.
Install the New Temperature Sensor
Take your new, OEM replacement sensor and plug its connector into the oven's wire harness. You should hear or feel a distinct 'click' when the locking tab engages. Remove your binder clip. Carefully feed the wire harness and the plastic connector back through the hole in the rear oven wall. Push it in until the mounting plate of the new sensor sits flush against the oven cavity. Reinstall the mounting screws and tighten them down snugly, but do not overtighten, as you could strip the sheet metal threads. Ensure the sensor wand is parallel to the oven ceiling and not touching the side walls.
⚠ Warning: Make sure no wires are pinched between the sensor mounting plate and the oven wall during reassembly. A pinched wire will short out against the chassis the moment you turn the power back on.
Reconnect Power and Calibrate if Necessary
Plug the oven back in or flip the breaker back on. Set the oven to 'Bake' at 350°F and monitor it. It should preheat steadily without throwing any error codes. If you have an oven thermometer, place it in the center of the middle rack to verify the internal temperature matches the digital display. Keep in mind that ovens cycle on and off, so the temperature will fluctuate slightly above and below 350°F. If the new sensor works but the oven is still consistently 10-15 degrees off, consult your owner's manual. Most modern electronic control boards allow you to manually calibrate the temperature offset by +/- 35 degrees through the settings menu.
Tip: To get an accurate reading from an oven thermometer, wait for the oven to signal it has preheated, then wait an additional 10 minutes for the cavity walls to fully absorb the heat before checking the dial.
Brand-specific notes
Some brands have known design quirks worth knowing about before you start.
Whirlpool
On many Whirlpool and KitchenAid freestanding ranges, the sensor is easily accessible from the front cavity. However, on some older models or built-in double ovens, the wire harness is secured to the back wall with a zip tie, meaning you cannot pull the connector through the front hole. In these cases, you must pull the unit out and remove the rear sheet metal access panel.
GE
GE (General Electric) and GE Profile ovens are notorious for throwing an 'F3' or 'F30' error code when the temperature sensor fails. GE sensors almost always use a quick-disconnect plug right inside the oven cavity, making this a very fast 5-minute repair. Just be sure to buy the correct OEM part, as GE has updated their sensor resistance curves on newer models.
LG
LG ranges sometimes feature very short wiring harnesses for the sensor. If you aren't careful and the wire slips back into the fiberglass insulation, you will absolutely have to pull the range out and remove the rear panel. LG sensors often mount with a Phillips screw rather than a hex head.
Samsung
Samsung ovens, particularly the FlexDuo series, are prone to throwing a 'C-21' or 'E-27' error code when the sensor drifts out of specification. Because these ovens have a divider that creates two temperature zones, they actually have two temperature sensors. Make sure you are testing and replacing the correct one (upper vs. lower) based on your error code.
Bosch
High-end European models like Bosch often route the sensor harness deep into the chassis for heat protection. Expect a slightly tighter fit when pulling the connector through. Always use genuine Bosch OEM parts; aftermarket universal sensors frequently have slightly different resistance curves that will confuse a Bosch control board.
What our techs see most often
Here in Southern California, we get a massive spike in 'my oven is burning everything' calls right before Thanksgiving and the December holidays. Nine times out of ten, it's a $20 temperature sensor that finally gave out after years of high-heat self-cleaning cycles, and it's a job most homeowners can easily swap out themselves in under an hour.
When to call a professional
- → The wire harness slips back into the rear insulation and you cannot safely remove the back panel to retrieve it.
- → You have a built-in wall oven that requires a specialized lift or two strong people to remove from the cabinetry to access the rear panel.
- → You smell gas while working around a gas range, or you accidentally bump the gas supply line when moving the unit.
- → Testing the sensor with a multimeter shows it is perfectly fine (~1080 ohms), indicating a more complex and expensive main control board failure.
- → The terminal block, wiring harness, or the sensor's plug shows obvious signs of melting, scorching, or electrical shorting.
- → Your home's electrical panel is outdated (like an old Zinsco or Federal Pacific panel common in older California homes) and the breaker won't reset properly.
Related Oven Troubleshooting
These troubleshooting guides cover problems this task can help solve.
Oven Broiler Not Working: Causes and Fixes
Oven Not Heating: Diagnose and Fix Both Electric and Gas Models
Oven Self-Clean Not Working: How to Diagnose
Oven Smoking: Why It Happens and How to Stop It
Oven Heats Unevenly: Why and How to Fix
Frequently asked questions
How much does a replacement oven temperature sensor cost?
The part itself is quite inexpensive, typically ranging from $15 to $40 depending on your oven's brand and model. We highly recommend purchasing OEM (Original Equipment Manufacturer) parts rather than cheap online knockoffs. The resistance curve needs to perfectly match your control board's programming, and cheap sensors often drift quickly, putting you right back where you started.
Can I just bypass the temperature sensor to finish baking my dinner?
Absolutely not. The temperature sensor is a critical operational and safety component. Bypassing it or hardwiring the connection will either cause the oven to not heat at all (because the board reads zero resistance), or worse, it will cause the oven to run continuously without stopping. This can trigger a blown thermal fuse, ruin your appliance, or start a severe kitchen fire.
What should a good temperature sensor read on a multimeter?
At normal room temperature (around 75°F or 24°C), a standard RTD (Resistance Temperature Detector) sensor should read approximately 1080 to 1100 Ohms. If your meter reads 'OL' (open loop/infinite resistance), zero (shorted), or a number significantly off the mark (like 800 Ohms or 1500 Ohms), the sensor is defective. The resistance goes up as the oven gets hotter.
Do I need to pull my oven away from the wall to do this repair?
In most modern freestanding ranges, you can replace the sensor entirely from inside the oven cavity by pulling the wire harness through the hole in the back wall. However, if the wire harness is too short, gets snagged, or accidentally slips behind the rear wall while you are working, you will need to pull the unit out and remove the back metal access panel to reach the connection.
My oven still bakes unevenly after replacing the sensor. What now?
If the new sensor tests fine but your baking is still off, you may need to calibrate the oven's control board. Most modern ovens allow you to adjust the temperature offset by +/- 35 degrees (check your manual for the button combination). If calibration doesn't help, you might be dealing with a weak bake element, a failing main control board relay, or a worn-out door gasket letting heat escape.
Related Repair Guides
Oven Heats Unevenly: Why and How to Fix
Cookies darker on one side of the sheet, cakes that rise lopsided, casseroles bubbling on the back but pale at the front — uneven oven heating is one of the most frustrating issues to diagnose because the oven still "works." The cause is usually a convection fan, a drifted temperature sensor, a weak bake element, or simple operator factors like preheating habits and pan choice. Most fixes are under an hour and many cost nothing at all.
Oven Not Heating: Diagnose and Fix Both Electric and Gas Models
An oven that lights up but never heats — or one that never even powers on the bake cycle — is the second most common cooking-appliance call we get. The diagnosis path is very different for gas versus electric, so this guide covers both. On electric ovens, a broken bake element or a drifted oven sensor accounts for roughly 70% of cases. On gas ovens, a weak igniter is the dominant failure. Most repairs are 1-2 hours and $30-180 in parts.
Oven Broiler Not Working: Causes and Fixes
When your oven's broiler refuses to heat, searing steaks and melting cheese becomes impossible. Discover the common culprits—from burnt-out electric elements to faulty gas igniters—and learn how to troubleshoot the problem safely.