At a glance
Symptoms
- • Cookies on the sheet brown more on one side than the other
- • Cakes rise lopsided or have a sunken corner
- • Top of dish browns long before bottom is cooked through
- • Convection mode no longer makes a noticeable difference
- • Independent oven thermometer disagrees with the displayed temperature by 30°F+
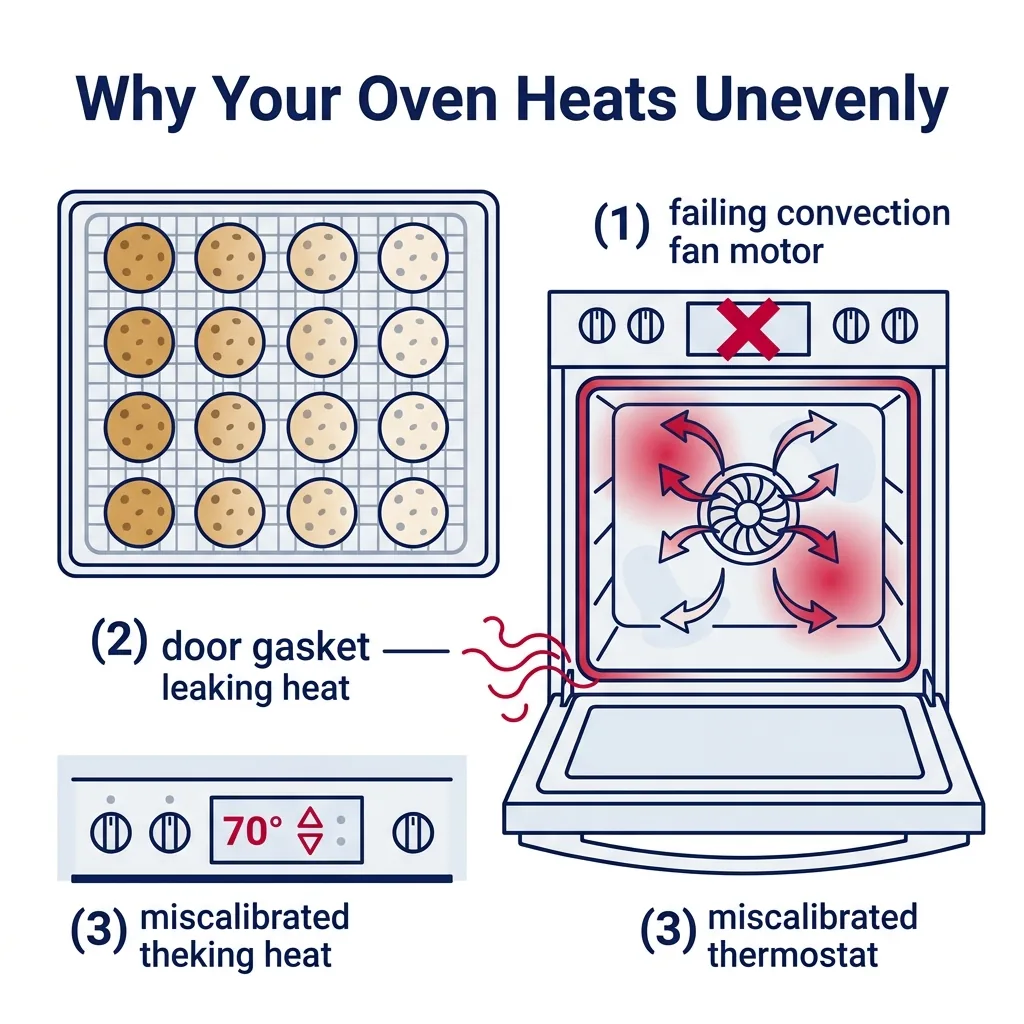
Common causes
- • Convection fan motor failed or running slow (convection ovens only)
- • Oven temperature sensor reading low — oven runs hotter than displayed
- • Weak bake element: still works but no longer reaching full wattage
- • Door gasket worn or torn, leaking heat from one side
- • Mis-calibrated thermostat (drift over years of use)
- • Cooking before the oven has fully heat-soaked (preheat pattern issue)
- • Cookware: dark-bottom pans absorb radiant heat unevenly vs. light pans
- • Oven not level — heat circulates unevenly, batter pools to one side
Safety First — Read Before You Start
- •Trip the oven's 240V breaker before removing any internal panels — even an "off" oven can have live elements.
- •On gas convection ovens, shut off the gas valve before pulling the convection fan housing.
- •Heating elements stay hot for at least an hour after use — verify cool to touch.
- •Use oven mitts when sliding in a thermometer or cookie sheet during a calibration test — door surfaces near the gasket reach 180°F+.
- •Do not adjust the calibration offset more than the manufacturer's allowed range (usually +/- 35°F). A larger discrepancy means a hardware problem, not a calibration problem.
Tools & supplies you'll need
- Independent oven thermometer (mercury or bimetal, around $10)
- Refrigerated tube of slice-and-bake cookies (the "cookie test")
- Phillips and 1/4-inch nut driver
- Multimeter (for sensor and element resistance)
- 4-foot bubble level
- Flashlight
Step-by-step instructions
Run the cookie test (3-pack diagnostic)
This is the single fastest, most informative diagnostic for uneven heating. Buy a tube of refrigerated slice-and-bake cookies, place 9 evenly-spaced cookies on a single sheet on the center rack, and bake at 350°F for the time on the package. When done, the color pattern of the 9 cookies tells you exactly what is wrong: (a) all 9 evenly browned = oven is fine, the issue is your old recipes/cookware; (b) front darker than back = door gasket leaking, or oven sloped forward; (c) one side darker than the other = convection fan failed (if convection oven) or oven not level; (d) edges darker, middle pale = bottom element weak or hot spots from element burn-out; (e) all 9 too pale = sensor drifted high (oven running cold); (f) all 9 too dark = sensor drifted low (oven running hot).
Tip: Take a phone photo of the finished cookies. Pattern recognition matters more than your subjective memory. Compare with the patterns above.
Verify with an independent oven thermometer
Place a $10 mercury or bimetal oven thermometer on the center rack, set the oven to 350°F, and let it run for 30 minutes (door closed) to fully heat-soak. Then open and read the thermometer. If actual temperature is within 25°F of setpoint, the oven temperature is correct and unevenness is from another cause (convection fan, gasket, cookware). If actual reads more than 25°F off, you have a sensor or calibration issue. Repeat the test with the thermometer on the upper, then lower rack — a healthy non-convection oven will be 15-25°F warmer at the top; more than 40°F difference suggests element weakness or air-flow obstruction.
Tip: Most ovens never get a 30-minute heat-soak in real cooking — homeowners hear the preheat beep at minute 8 and start baking. The walls are still cold, and the cycling is uneven. Always wait an extra 10 minutes after the beep for serious baking.
Check that the oven is level
Place a 4-foot level on the center rack — front to back, then side to side. The bubble should be centered in both directions. An out-of-level oven causes batter to pool to the low side, and heated air convects unevenly. Adjust the leveling feet at the bottom corners (most ranges have a hex-head adjuster you turn with a wrench). For wall ovens that are not level, the cabinet shimming was wrong at install — slide thin shims under the front or back of the chassis as needed.
Inspect and clean the convection fan (convection ovens only)
With power off, remove the back inner panel of the oven cavity (typically 4 screws) to expose the convection fan blade and motor. Spin the fan by hand — it should turn smoothly with no wobble or grinding. A fan with a worn motor bearing will spin but at lower RPM, dramatically reducing convection effect. Clean any grease and food spatter off the blade — accumulated grime unbalances the fan and slows it. Power back up and run convection mode; the fan should run audibly. If silent or wobbly, replace the convection fan motor — $80-180 part. Also check for a loose blade hub (a 7/16" nut on the motor shaft) — Whirlpool and KitchenAid models lose the hub nut and the blade slows independent of the motor.
⚠ Warning: On true convection ovens, the fan housing also contains a third heating element (convection bake element). Inspect it for burn-through while you are in there.
Test the bake element wattage and visual condition
A bake element that has aged and lost wattage will heat — but slowly and unevenly, leaving cold spots. Visually inspect for bulges, blisters, and burn-through. With power off, disconnect one terminal and measure resistance: 19-30 ohms is typical for a 3000-3500W element. Significantly higher resistance means the element has degraded internally. Compare against the broil element if both look similar age. Replacement element: $30-90, 10-minute swap from inside the oven cavity.
Tip: A bake element that has burned through at one specific spot creates a "hot zone" right above that point — your cookies on that side of the sheet always burn first. Visual inspection alone usually catches it.
Replace or recalibrate the temperature sensor
If the cookie test and thermometer test both confirm the oven runs consistently hot or cold, the sensor has drifted. Most modern ovens (post-2008) have a calibration menu that lets you offset the displayed setpoint by +/- 35°F. Run the offset toward correct: if oven runs 30°F hot, calibrate -30°F. For larger discrepancies or unstable readings (oven swings 50°F+ between cycles), the sensor itself has failed and needs replacement. Pull the sensor (two screws at the back of the cavity), measure resistance at room temperature — should be approximately 1080 ohms — and replace if out of spec ($25-55 part).
Tip: After any sensor replacement, re-run the calibration adjustment from zero — new sensors are usually within +/- 5°F and do not need a large offset.
Inspect the door gasket and look for heat leaks
Run the oven at 400°F for 20 minutes, then carefully (oven mitt) run your hand along the perimeter of the closed door — about 3 inches off the surface. You should not feel a strong stream of hot air anywhere. Hot air escaping at the top corners means the gasket has shrunk or hardened. Hot air escaping at the bottom front means the door hinge has stretched and the door is hanging away from the gasket. Replacement door gasket: $35-90 part, 30 minutes. Hinge replacement: $80-180 a pair, more involved but doable.
⚠ Warning: Do not press your hand to the door surface — exterior glass reaches 180-200°F during high-heat cooking.
Address cookware and habits — sometimes the oven is innocent
Dark non-stick pans absorb radiant heat dramatically more than light aluminum, especially on the bottom — a swap from dark to light reduces bottom-burn by 25-50°F effective. Crowded racks block convection (even on non-convection ovens, where natural convection still matters); leave 2 inches between pans and walls. Lining the bottom rack with foil ruins the heat circulation pattern (and on gas ovens, can cover the bake burner vent — fire hazard). Always preheat at least 15 minutes for serious baking, and rotate sheets halfway through if your oven has a known mild bias.
Tip: A high-end "uneven" oven that bakes a perfect cookie test is not actually uneven — change pans, change preheat habits, and stop chasing a phantom repair.
Brand-specific notes
Some brands have known design quirks worth knowing about before you start.
GE Profile / Cafe
GE Profile (PT, PB) and Cafe (CTS, CT) convection wall ovens have a known issue with the convection fan motor losing torque around year 6-9. Symptom: convection mode is no louder than fan-off mode, and convection bakes look just like regular bakes. Motor replacement runs $90-160. The third "true convection" element behind the fan housing is also a frequent burnout — check both at the same time.
KitchenAid
KitchenAid KOSE, KOSC, and KOCE wall ovens have a particularly tight calibration tolerance — sensors drift 20-30°F low after 4-7 years of use. Symptom: bakes always come out underdone at the displayed time. The calibration menu allows up to +35°F offset which usually solves it; if you are at +35°F and still underdone, the sensor needs replacing. Igniter on the gas-cooktop double-oven combos is the same Norton ceramic style that fails at year 4-7 (see the "not heating" guide).
Samsung
Samsung NX, NV, and NE convection ranges have a unique twin-element convection design (top and bottom convection coils). When one of the two convection elements fails, the oven still convects but with a strong bottom-up or top-down bias. Symptom: convection bakes brown only on top OR only on bottom. Diagnose by visual inspection through the door window during preheat — only one ring should glow if one is dead. Replacement element: $50-110 part.
LG
LG LRE, LSE, and LDE convection ranges are sensitive to door gasket wear — these gaskets compress flat at year 5-7 and leak heat at the top corners, producing a clear front-to-back temperature gradient. The gasket pulls out by hand and replacement is $35-65. After installing, a 50-cycle "break-in" softens the new gasket — uneven heating may persist for the first week.
Frigidaire / Electrolux
Frigidaire FGEH, FFEW and Electrolux EW convection wall ovens use a hidden bake element under the cavity floor (covered by a porcelain panel). When this element weakens, you get a textbook "raw bottom, browned top" cookie test. The element is more involved to replace than a visible bottom element — pull the entire oven out, drop the bottom panel, swap the element. Allow 1.5-2 hours for the job. Part is $50-110.
What our techs see most often
We get a lot of "my oven is uneven" calls in LA where the oven is actually fine — the customer upgraded from a 20-year-old electric range to a brand-new convection model and is still using their old cooking times. New ovens with active convection cook 25°F hotter and 15-25% faster than old ones. We always run the cookie test on these calls. Roughly half the time the oven is fine and we coach the customer through new habits; the other half, it is a weak bake element or a slow convection fan that the homeowner has been compensating for without realizing it. The cookie test takes 12 minutes and saves a $90 diagnostic when the oven turns out to be fine.
When to call a professional
- → Cookie test shows a clear pattern but you have replaced the sensor and element with no improvement
- → Convection fan replaced but convection still has no measurable effect
- → Calibration offset is at the maximum +/- 35°F and the oven still reads incorrect
- → Wall oven removal is needed for repair (heavy, two-person job)
- → Repeated bake element burnouts in a short time (suggests an underlying short or relay sticking)
- → Smoke or scorching from the convection fan housing
Oven Maintenance & Replacement Tasks
Step-by-step guides for individual maintenance jobs related to this appliance.
Frequently asked questions
Why are my cookies always darker on one side of the sheet?
If the dark side is consistent (always the right side, always the back), the oven has uneven heat distribution — usually a failed convection fan, an uneven bake element, or the oven is not level. Run the cookie test described in step 1 to identify which. If the dark side moves around, the issue is your sheet position or rotating habits.
My oven thermometer reads 25°F lower than the displayed temperature — is this a problem?
A 15-25°F discrepancy is within normal variation for residential ovens, especially during the early minutes of preheat. After a 30-minute heat-soak, anything beyond 25°F off should be calibrated using the oven's built-in offset. Beyond 35°F off, replace the temperature sensor.
Should I always preheat my oven longer than the beep tells me?
Yes for serious baking (cakes, breads, pastries, soufflés). The preheat beep fires when the air in the cavity reaches setpoint, but the walls and racks are still cold and absorb heat from your dish. Add 10-15 minutes of soak time after the beep before placing baked goods. For broiling and reheating, the beep is fine.
Does it matter if I use dark non-stick pans vs. light aluminum?
Hugely. Dark pans absorb 25-50°F more effective bottom heat than light aluminum, which is why "dark non-stick" cookies always burn on the bottom. Either reduce oven temperature by 25°F when using dark pans, or switch to light aluminum / glass for baking. Convection mode partially compensates but does not eliminate the difference.
How much does it cost to fix uneven oven heating?
Convection fan motor: $80-180 part, $250-380 installed. Oven temperature sensor: $25-55 part, $150-220 installed. Bake element: $30-90 part, $180-260 installed. Door gasket: $35-90 part, $160-230 installed. Calibration is free if your oven is in tolerance. At Axis our $90 diagnostic fee is credited toward the repair.
Related Repair Guides
Oven Not Heating: Diagnose and Fix Both Electric and Gas Models
An oven that lights up but never heats — or one that never even powers on the bake cycle — is the second most common cooking-appliance call we get. The diagnosis path is very different for gas versus electric, so this guide covers both. On electric ovens, a broken bake element or a drifted oven sensor accounts for roughly 70% of cases. On gas ovens, a weak igniter is the dominant failure. Most repairs are 1-2 hours and $30-180 in parts.
Oven Broiler Not Working: Causes and Fixes
When your oven's broiler refuses to heat, searing steaks and melting cheese becomes impossible. Discover the common culprits—from burnt-out electric elements to faulty gas igniters—and learn how to troubleshoot the problem safely.
How to Calibrate Your Oven Thermostat
Stop burning your cookies or serving undercooked roasts. Calibrating your oven's thermostat is a simple, no-tools-required tweak that ensures the temperature on your display matches the actual heat inside.