At a glance
Symptoms
- • Visible yellow or brown sticky residue coating the metal mesh
- • Smoke lingering in the kitchen even with the exhaust fan on high
- • Unpleasant, stale cooking odors lingering in the home for days
- • Grease droplets forming on the hood and dripping onto your stovetop
- • Fan motor sounds like it is straining, whining, or working harder than usual
- • It has been more than a month since you last cleaned it (especially if you cook with oil frequently)
Common causes
- • Prevents dangerous grease fires from igniting over high-heat burners
- • Protects the fan motor from burning out due to restricted airflow (saving a $150-$300 repair)
- • Maintains indoor air quality, which is essential in tightly sealed modern California homes
- • Stops greasy, sticky residue from coating your kitchen cabinets, walls, and ceilings
- • Improves the efficiency of your HVAC system by properly exhausting excess cooking heat and steam
- • Extends the life of secondary charcoal filters in ductless (recirculating) range hood setups
Safety First — Read Before You Start
- •Turn off the range hood fan and lights before removing the filters to prevent injury from spinning blower blades or burns from hot halogen bulbs.
- •Allow the stove, hood, and filters to cool completely if you have just finished cooking before attempting removal.
- •Never operate the range hood without the grease filters installed; airborne grease will get sucked directly into the blower motor and ductwork, creating a major fire hazard.
- •If using heavy-duty chemical degreasers, ensure adequate ventilation in your kitchen and wear protective rubber gloves to prevent skin irritation.
- •Be extremely careful when handling metal filters over a glass or ceramic cooktop. Dropping a filter edge-down can crack the glass, leading to a costly stovetop replacement.
Tools & supplies you'll need
- Very hot or boiling water
- Grease-cutting dish soap (e.g., Dawn Heavy Duty)
- Baking soda (1/2 cup)
- Non-abrasive scrub brush or old toothbrush
- Microfiber cloths or paper towels
- Heavy-duty degreaser spray (optional, for severe buildup)
- Large sink, basin, or rimmed baking sheet
Step-by-step instructions
Remove the Grease Filters
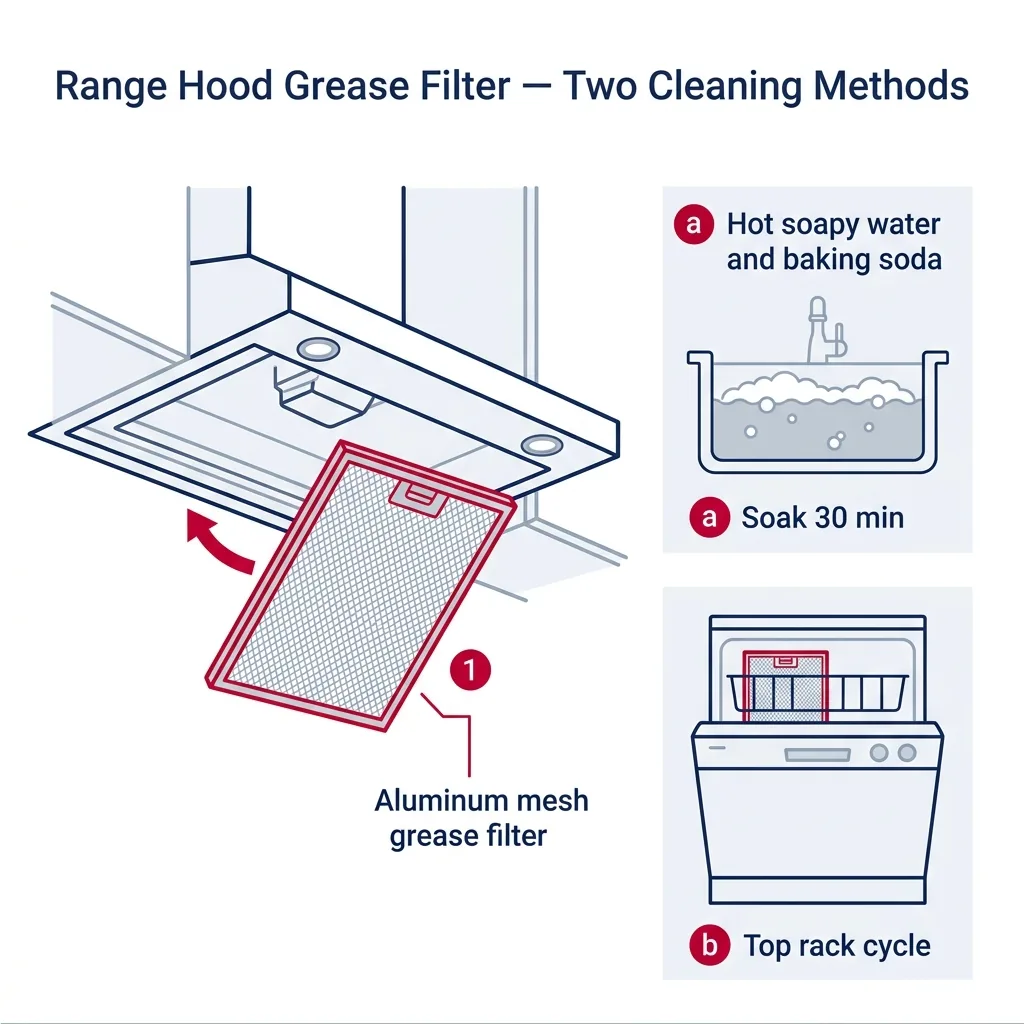
Start by ensuring the range hood is powered off and the cooking surface below is cool. Most aluminum mesh grease filters have a small plastic or metal latch, loop, or pull-tab. Push the filter gently toward the back of the hood to compress the spring-loaded edge, then pull the tab down to release the front edge. Slide the filter out of its track. If you have stainless steel baffle filters, they usually lift up and slide out of a bottom channel. Set the filters aside carefully. Take this opportunity to look up into the hood cavity—if you see massive grease stalactites hanging from the motor, you might have a bigger cleaning job ahead of you.
Tip: Place an old towel over your stovetop before you begin. This protects a delicate glass cooktop from scratches or cracks if you accidentally drop a slippery filter.
⚠ Warning: Do not yank or force the filter if it feels stuck. Grease can act like glue. Wiggle it gently or spray a tiny bit of degreaser on the edges to loosen it.
Prepare the Soaking Solution
The secret to dissolving polymerized cooking grease without endless scrubbing is a combination of high heat, surfactants, and mild alkalinity. Plug your kitchen sink and fill it with boiling water (or the hottest water your tap can produce). Add a generous squirt of a high-quality, grease-cutting dish soap. Next, pour in about 1/4 to 1/2 cup of baking soda. The water will fizz as the baking soda reacts. Swish the water around with a long brush to mix it. If your sink isn't large enough to lay the filters flat, you can use a large heat-proof plastic bin or even a rimmed baking sheet.
Tip: Here in Southern California, hard water (often 250-400 ppm in LA and Orange County) can reduce the effectiveness of soap. If your tap water is very hard, add an extra squirt of dish soap to ensure a good lather.
Submerge and Soak the Filters
Place your greasy filters into the hot soapy solution. Ensure they are completely submerged. If they tend to float, you can weigh them down with a heavy coffee mug or a glass bowl. Let the filters soak undisturbed for 15 to 30 minutes. During this time, the hot water melts the grease, the dish soap breaks the surface tension, and the alkaline baking soda breaks down the tough ester bonds in the baked-on oils. You should see the water turn a cloudy yellow or brown as the grease lifts off the metal mesh.
⚠ Warning: Do not leave aluminum filters soaking for hours or overnight, especially in highly alkaline solutions or if you added harsh chemicals. Prolonged exposure can oxidize and discolor the aluminum.
Scrub Away the Softened Grease
After the soak, most of the grease should have dissolved into the water. Take a non-abrasive scrub brush or an old toothbrush and gently scrub the remaining residue on the filter. Pay special attention to the edges and the area around the pull-tab, as grease tends to pool there. For aluminum mesh filters, use very light pressure—the layers of aluminum foil mesh are delicate and can easily dent, tear, or separate if you scrub too aggressively. If you encounter stubborn spots that won't budge, spray them directly with a heavy-duty citrus degreaser, wait 5 minutes, and scrub again.
Rinse Thoroughly
Once the filters look clean and the mesh is free of sticky residue, drain the dirty water from your sink. Turn on your faucet to the hottest setting and thoroughly rinse each filter. It is critical to wash away all the soap and baking soda residue; if left on the filter, baking soda can leave a white, chalky film, and soap residue will attract new grease even faster. Use a spray nozzle if you have one to force water through the layers of the mesh, ensuring the inside layers are just as clean as the outside.
Dry Completely and Reinstall
Shake the filters gently over the sink to remove excess trapped water. Wipe the frames down with a microfiber cloth or paper towel. Allow the filters to air dry completely on a dish rack or a towel. Do not reinstall them while they are still dripping wet, as water drawn into the electrical components of the blower motor can cause a short circuit. Once bone dry, reinstall the filters by reversing the removal process: slide the back edge into the rear channel, push against the spring, and snap the front edge up into place. Make sure they are seated securely so they don't fall onto your stove while cooking.
Brand-specific notes
Some brands have known design quirks worth knowing about before you start.
Zephyr & Kobe
High-end Asian and European style hoods often use professional-style stainless steel baffle filters instead of aluminum mesh. These are much more durable and can almost always go straight into the dishwasher without discoloring. They are designed for heavy wok cooking and trap grease very efficiently.
Whirlpool & GE
Standard builder-grade hoods from these brands often feature thin aluminum mesh filters. Be very gentle when scrubbing these, as the layers easily dent or tear. Fortunately, if you accidentally ruin one or it's simply too far gone, OEM replacements are very affordable, typically ranging from $15 to $30.
Broan & NuTone
Many of these units are set up for ductless (recirculating) operation. They often have a black charcoal odor filter clipped onto the back of the silver aluminum grease filter. Never wash the charcoal filter—water will ruin the carbon. Remove it before washing the aluminum mesh, and replace the charcoal filter entirely every 3 to 6 months.
Sub-Zero & Wolf
Pro-style luxury hoods use heavy stainless baffles and often feature removable grease cups or troughs at the back. Empty the grease cups with a paper towel before washing. The baffles are dishwasher safe, but high-heat drying cycles might bake on stubborn grease if you didn't scrub the heavy residue off first.
Samsung & LG
Modern smart hoods often have a 'Clean Filter' indicator light that illuminates after a set number of operating hours. After you wash and reinstall the filter, remember to press and hold the filter reset button (usually for 3 seconds) to clear the notification, otherwise the hood may beep or refuse to run at full speed.
What our techs see most often
Here in the LA basin, we see a lot of burned-out range hood motors simply because the mesh filters were completely choked with grease. A $15 bottle of degreaser and a monthly soak can literally save you a $350 blower motor replacement, especially in those hillside homes where ventilation runs are long and the motor has to work extra hard to push air out.
When to call a professional
- → The fan motor makes a loud grinding, squealing, or rattling noise even after the filters are completely clean.
- → The hood has little to no suction at all, indicating a broken blower wheel or a blocked exhaust duct.
- → You see exposed, melted, or frayed wiring when you remove the filters to look inside the cavity.
- → The grease buildup is heavy inside the motor housing or extends far up into the ductwork (this requires professional deep cleaning to prevent chimney fires).
- → The range hood keeps tripping your kitchen's GFCI outlet or the main circuit breaker when you turn it on.
Related Range Hood Troubleshooting
These troubleshooting guides cover problems this task can help solve.
Frequently asked questions
Can I just put my aluminum mesh filters in the dishwasher?
You can, but proceed with caution. Dishwasher detergent is highly alkaline and can oxidize aluminum, turning it a dull, chalky gray. While the filter will still function perfectly fine, it won't look shiny anymore. Stainless steel baffle filters, however, are totally dishwasher safe. If you do ruin the finish of an aluminum filter and want it to look new, replacements typically cost $15 to $40.
How often should I clean my range hood filters?
It depends entirely on your cooking habits. If you fry foods, cook with a wok, or sear fatty meats frequently, you should clean them once a month. For households that primarily boil, steam, or bake, cleaning the filters every 2 to 3 months is usually sufficient to maintain good airflow.
What if the grease is totally baked on and won't come off with baking soda?
If a boiling water and baking soda soak doesn't work, step up to a commercial citrus degreaser or a heavy-duty foaming automotive degreaser (like Simple Green Pro). Spray it on, let it sit for 10-15 minutes, then scrub. If the grease has literally fossilized into a hard resin, it's often not worth the elbow grease—just buy a replacement filter online for about $20-$35.
My range hood doesn't vent outside. Does cleaning the filter still matter?
Absolutely, it matters even more. Recirculating (ductless) hoods rely on the metal grease filter to catch heavy oils before the air passes through a secondary charcoal odor filter. If the metal grease filter is clogged, grease bypasses it and instantly ruins the charcoal filter (a $20-$50 replacement). You'll end up blowing greasy, smelly air right back into your kitchen.
Why is grease dripping from my hood even after cleaning the filter?
This usually means grease has bypassed a previously clogged filter and pooled in the internal blower housing or the ductwork above. You will need to remove the filters again, spray a rag with degreaser, and wipe down the interior metal cavity. If the duct itself is saturated, you may need a professional exhaust cleaning service, which typically runs $150 to $300.
Related Repair Guides
Range Hood Not Pulling Smoke: Fix Weak Suction
A range hood with weak suction is rarely a broken hood. The single most common cause is a clogged grease filter — over half of all weak-suction calls. Other causes are clogged ductwork, an undersized hood for the stove, an outdoor vent with a stuck damper, or for ductless models a saturated charcoal filter. Most of this is maintenance, not repair.
Range Hood Fan Not Working: Causes and Fixes
A range hood where the lights work but the fan does not is a textbook 'isolate the failed circuit' problem. The fan and lights are usually on shared power but separate switches and motor circuits, so loss of fan with working lights points to the switch, capacitor, motor, or (on electronic models) the control board. Most fixes are under $80 in parts.
Range Hood Light Not Working: Fix Guide
Cooking in the dark is no fun, and a broken range hood light is one of the most common kitchen annoyances. Whether it's a simple burnt bulb, a grease-clogged switch, or a failed transformer, this guide will help you diagnose and fix the issue safely.