At a glance
Symptoms
- • Burner clicks continuously but fails to ignite
- • Uneven, lazy, or sputtering gas flames
- • Flames are yellow or orange instead of a crisp blue
- • Visible grease, boil-over crust, or burnt food around the burner base
- • Gas smell when trying to light a burner due to delayed ignition
- • Burner only lights on one side of the circle
Common causes
- • Prevents the igniter from sparking properly against the burner cap
- • Restores proper oxygen-to-gas mixture, eliminating dangerous carbon monoxide production from yellow flames
- • Extends the lifespan of the spark module by stopping endless clicking
- • Maintains even heat distribution for better cooking performance
- • Prevents permanent staining and pitting on expensive enamel or brass burner caps
Safety First — Read Before You Start
- •Never attempt to clean the burners while they are hot or immediately after cooking. Let the stovetop cool completely.
- •Ensure all burner control knobs are in the OFF position before starting.
- •Do not use metal safety pins, paperclips, or needles to clean burner ports; enlarging the holes will ruin the burner head and cause dangerous flare-ups.
- •Never spray cleaning solutions directly onto the spark igniter, as this can short out the delicate ceramic housing.
- •Do not attempt to remove or modify the gas supply valves or internal gas lines. If you suspect a gas leak, shut off the main valve and call a professional.
Tools & supplies you'll need
- Dish soap (grease-cutting, like Dawn)
- Non-abrasive nylon scrub brush or old toothbrush
- Wooden toothpicks (never use metal pins or needles)
- Microfiber cloths or paper towels
- Baking soda (for stubborn boil-overs)
- White vinegar (for hard water mineral deposits)
Step-by-step instructions
Prepare the Stovetop and Remove Grates
Start by ensuring the stove is completely cool to the touch and all control knobs are turned to the off position. Remove the heavy cast-iron burner grates and set them aside on a towel to protect your countertops. Take a quick photo of your stovetop before removing any parts; gas stoves often have different sized burners (simmer, standard, power boil), and it is crucial to return each cap and head to its original position to ensure proper gas flow and prevent massive flare-ups.
Tip: If your grates are also covered in grease, you can soak them in a sink full of hot, soapy water while you work on the burner caps.
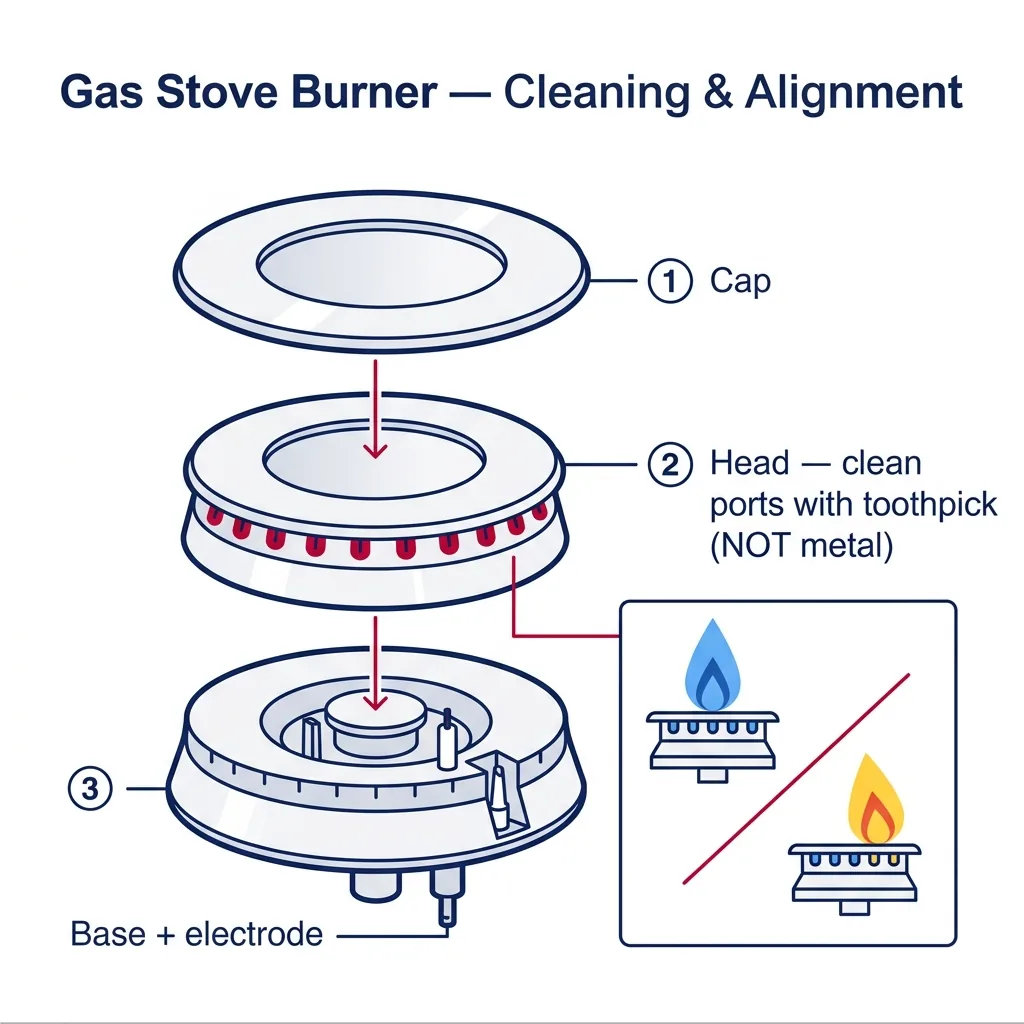
Remove the Burner Caps and Heads
Lift the burner caps (the flat, usually black or brass discs sitting on top) straight up. Underneath the cap is the burner head (the slotted metal piece where the gas actually comes out). Lift the burner head straight up to remove it from the base. Be extremely careful not to bump or snag the white ceramic igniter post sticking up from the stovetop base. These igniters are incredibly fragile and snapping one will turn a free cleaning job into a $30-$60 parts replacement.
⚠ Warning: Do not attempt to unscrew the base of the burner that is attached to the glass or enamel cooktop. You are only removing the loose, top-sitting components.
Soak the Components
Fill your sink or a large basin with warm water and a generous squirt of grease-cutting dish soap. Submerge the burner caps and heads in the soapy water. If you live in an area with very hard water (like Los Angeles or Orange County, where water hardness frequently exceeds 250 ppm), add a half-cup of white vinegar to the soak to help dissolve calcium and mineral deposits. Let the parts soak for 20 to 30 minutes to loosen baked-on grease and starch from boil-overs.
Scrub the Caps and Heads
After soaking, use a non-abrasive nylon scrub brush or an old toothbrush to scrub the surface of the burner caps and the exterior of the burner heads. For extremely stubborn, burnt-on food, make a paste of baking soda and water, apply it to the stain, and let it sit for 10 minutes before scrubbing again. Avoid using steel wool, abrasive scouring pads, or harsh chemical oven cleaners, as these will permanently scratch the enamel coating and strip the finish off aluminum or brass parts.
Clear the Burner Ports
This is the most critical step for fixing yellow flames or clicking igniters. The burner head has a series of small slots or holes around its perimeter called ports. Use a wooden toothpick to gently poke into each slot, dislodging any trapped grease, food particles, or cleaning residue. Work your way around the entire circumference of every burner head. The gas needs to flow evenly out of these ports to mix with oxygen properly and create a clean, blue flame.
⚠ Warning: Never use a metal safety pin, needle, or drill bit to clear the ports. The metal is softer than you think, and scratching or enlarging these precision-machined holes will permanently ruin the burner's flame pattern.
Rinse and Dry Completely
Rinse all caps and heads thoroughly under warm running water to remove all soap and baking soda residue. Now, they must be dried completely. Even a single drop of water left inside the burner head or on the cap can cause the igniter to click endlessly without lighting. Wipe them down with a microfiber cloth, then let them air dry upside down for at least 30-60 minutes. In areas with high coastal humidity like San Diego or Ventura, you may want to use a hairdryer on a low setting or place them in a warm oven (under 150 degrees) for 10 minutes to guarantee they are bone dry.
Tip: Shake the burner heads gently. If you hear water rattling inside the hollow chambers, they need more time to dry.
Reassemble and Test the Burners
Once completely dry, place the burner heads back onto their corresponding bases. Look closely at the bottom of the burner head; most have alignment pins, notches, or a specific cutout for the igniter electrode. The head must sit perfectly flat and lock into place without wobbling. Place the correct burner cap on top of each head, ensuring it is centered and flat. Turn on the exhaust fan and test each burner. It should ignite quickly within 2-3 clicks and produce an even, crisp blue flame around the entire ring.
Brand-specific notes
Some brands have known design quirks worth knowing about before you start.
Wolf / Sub-Zero
Wolf ranges feature dual-stacked sealed burners. The brass burner components tarnish naturally over time due to heat. Don't use harsh chemical polishes to keep them shiny, just keep the ports clear. If they become severely damaged, replacement brass caps run $40-$80 each.
Thermador
Thermador is famous for its patented Star Burners. Be extra careful with the intricate points of the star when using a toothpick to clear the ports. The heavy porcelain coating on these caps can chip easily if dropped in a cast-iron sink.
LG & Samsung
These brands often use aluminum burner heads that can oxidize and discolor severely if run through a dishwasher. Always hand wash them. If the aluminum is deeply pitted from acidic food spills (like tomato sauce), replacement heads cost about $25-$45.
GE / Café / Monogram
Many GE models feature a large oval center griddle burner. This long burner head is prone to warping if removed and scrubbed aggressively while it is still hot. Always let the center burner cool completely before attempting to clean it.
Whirlpool / KitchenAid
Watch out for the tiny ceramic igniter post positioned very close to the burner head. On KitchenAid models especially, it's incredibly fragile. Bumping it with a heavy cast-iron grate or a scrub brush will crack the ceramic, requiring a $30-$60 igniter replacement.
What our techs see most often
Here in Los Angeles, at least a quarter of our 'stove won't light' calls end up just being a massive pasta boil-over that crusted over the burner head. A quick 30-minute soak and a wooden toothpick scrub saves you our $125-$185 service call fee, plus it keeps that endless clicking from driving you crazy.
When to call a professional
- → You smell gas even when the stove is completely turned off and the room is ventilated.
- → The burner continues to click endlessly even after you have allowed the cleaned components to dry for 48 hours.
- → Flames remain mostly yellow or orange after a thorough cleaning, indicating a deeper gas pressure or air shutter issue.
- → The white ceramic igniter is visibly cracked, or the wire beneath it is frayed and sparking against the chassis.
- → You suspect an issue requiring access to the internal gas valves, regulators, or manifold beneath the cooktop.
Related Stove Troubleshooting
These troubleshooting guides cover problems this task can help solve.
Electric Stove Burner Not Heating: How to Fix
Gas Stove Keeps Clicking: How to Stop It
Gas Stove Burner Won't Ignite: Causes and Fixes
Cracked Glass Cooktop: What to Do and When to Replace
Frequently asked questions
Can I put my gas stove burner caps in the dishwasher?
We strongly advise against it. Dishwasher detergent is highly alkaline and will strip the protective enamel from caps or permanently discolor aluminum and brass burner heads. Hand washing with mild dish soap is the safest method. Replacing a ruined set of caps can cost $100-$250 depending on your stove's brand.
Why is my burner flame yellow instead of blue?
A yellow flame indicates incomplete combustion, usually caused by a lack of oxygen mixing with the gas. This most commonly happens when the small slots (ports) on the burner head are clogged with grease, soot, or debris. If cleaning them thoroughly doesn't resolve the yellow flame, a professional may need to adjust the air shutter or test your gas regulator.
I cleaned my burners and now they won't stop clicking. What did I do wrong?
Moisture is the absolute enemy of the spark ignition system. If water gets trapped under the burner cap or inside the igniter housing during cleaning, the system will short out and continuously spark. Turn off the stove, remove the caps and heads, and let them air dry for another 24 hours. You can speed this up with a hairdryer on a low setting.
How often should I clean my burner caps and heads?
For average daily cooking, a deep clean every 3 to 6 months is ideal. However, you should spot-clean the components immediately after any major boil-over (like starchy pasta water or soup) to prevent the sugars and starches from baking onto the ports and permanently staining the enamel.
Can I use a needle or safety pin to unclog the burner ports?
Absolutely not. Gas burner ports are precision-machined to deliver an exact amount of gas for a balanced flame. Using hard metal tools can scratch or enlarge the holes, leading to uneven flames, dangerous flare-ups, or an annoying whistling sound while cooking. Always use a soft wooden toothpick.
Related Repair Guides
Gas Stove Keeps Clicking: How to Stop It
A gas burner that clicks endlessly without lighting — or one that won't stop clicking even after you turn it off — is usually a moisture or alignment problem, not a broken part. Most fixes are housekeeping and take under 30 minutes. The underlying spark module is rarely the problem on the first complaint, but constant moisture exposure can eventually take it out.
Gas Stove Burner Won't Ignite: Causes and Fixes
When you turn the stove knob and hear clicking but see no flame, or hear nothing at all, your gas burner needs attention. We will walk you through diagnosing and fixing the most common ignition failures safely, from simple clogs to electrical faults.
Electric Stove Burner Not Heating: How to Fix
An electric burner that does not heat is one of the simpler appliance failures to diagnose. The most common causes are a burnt-out heating element, a failed infinite switch, a bad burner socket / receptacle, or a loose terminal connection. The diagnosis path differs slightly between coil-element stoves and smooth-top (radiant) ranges. Most repairs are under $50 in parts and under an hour.