At a glance
Symptoms
- • Clothes take more than one cycle to dry completely.
- • The top of the dryer or the laundry room feels unusually hot during operation.
- • Lint builds up heavily around the door seal or outside the lint screen area.
- • You notice a faint burning or dusty smell when the dryer is running.
- • The lint screen itself is physically difficult to push all the way back into its slot.
- • The dryer displays an airflow restriction error code (common on modern smart dryers).
Common causes
- • Prevents devastating house fires, as lint is highly combustible and can easily ignite if it reaches the heating element.
- • Reduces energy bills by shortening drying cycles and improving overall thermal efficiency.
- • Extends the life of the dryer's heating element, thermistors, and thermal fuses by preventing chronic overheating.
- • Prevents internal moisture buildup and rust, which is especially problematic for garage installations in humid coastal areas like San Diego or Ventura.
Safety First — Read Before You Start
- •Always unplug the dryer from the wall outlet before removing any panels to completely eliminate the risk of electrical shock.
- •If you have a gas dryer, do not pull the unit away from the wall forcefully. Check the flexible gas line to ensure you aren't stretching or crimping it, which can cause dangerous gas leaks.
- •Wear heavy-duty work gloves when reaching inside the dryer cabinet. The internal stamped sheet metal edges are notoriously sharp and will easily slice bare hands.
- •Never use a leaf blower or compressed air to blow lint out from the inside. This forces highly flammable lint directly into the motor winding and heating element housings.
Tools & supplies you'll need
- Screwdriver set (Phillips and flathead)
- Putty knife or 5-in-1 painter's tool
- Shop-vac with a crevice attachment
- Flexible dryer lint brush (usually $10-$15 at hardware stores)
- Work gloves (leather or cut-resistant)
- Isopropyl rubbing alcohol and a microfiber cloth
Step-by-step instructions
Unplug the Dryer and Remove the Lint Screen
First, completely disconnect the dryer from power. For electric models, pull the large 240V plug from the wall. For gas models, unplug the standard 120V cord. If you need to pull the dryer forward, do so gently, watching the vent hose and gas line (if applicable). Pull the lint screen completely out of the dryer and set it aside. Use this opportunity to wash the screen in the sink with warm soapy water and a soft brush to remove invisible fabric softener buildup, then let it air dry.
Tip: If water pools on the mesh of your lint screen instead of flowing straight through, it's coated in fabric softener residue. A quick scrub with dish soap will fix this and instantly improve airflow.
⚠ Warning: Never bypass or skip unplugging the machine. Even with the dryer turned off at the control panel, live voltage is present at the terminal block and internal switches.
Release and Lift the Top Panel
Depending on your dryer model, you'll need to lift the main top panel to access the internal housing. For many front-load style dryers (like LG, Samsung, and newer Whirlpools), there are two or three screws at the top rear of the machine. Remove these, slide the top panel back an inch, and lift it off. For traditional top-load style dryers with the lint screen inside the door, insert a putty knife into the seam between the top and front panels (about 3 inches in from each corner) to depress the hidden spring clips. Once released, the top panel will hinge backward. Lean it securely against the wall.
Tip: Wrap the blade of your putty knife in a layer of masking tape to prevent scratching the enamel finish of your dryer when popping the spring clips.
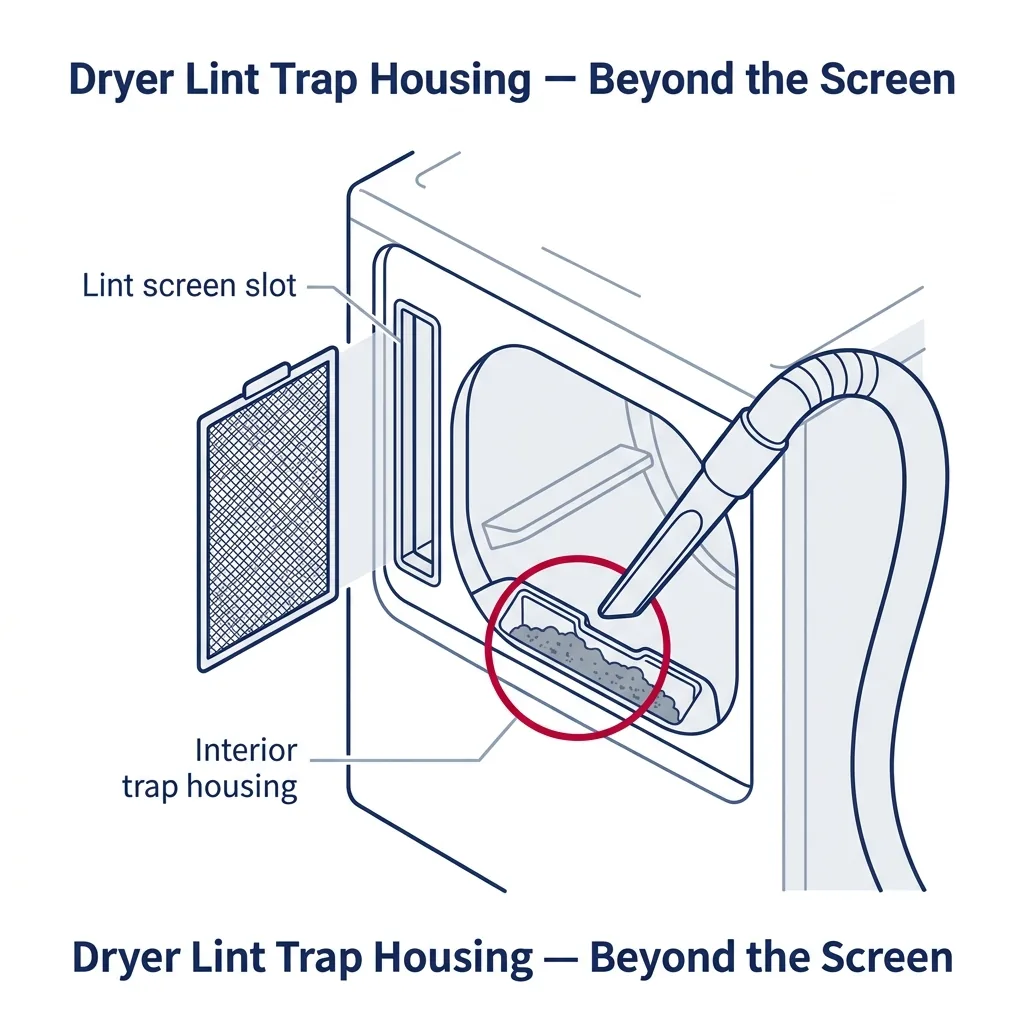
Vacuum the Primary Lint Chute
With the top panel out of the way or the screen removed, take your Shop-vac with a narrow crevice tool and vacuum directly down into the slot where the lint screen normally sits. Plunge the crevice tool as deep as it will go to extract the loose, fluffy lint. Next, take your flexible dryer lint brush and push it down into the chute, twisting it to grab onto stubborn lint clumps clinging to the walls of the housing. Pull the brush out, vacuum off the debris, and repeat this plunging process until the brush comes up clean.
⚠ Warning: Be gentle when pushing the brush down the chute. If you feel hard resistance, stop pushing. You don't want to accidentally damage the moisture sensor bars or the delicate thermistor wiring located near the bottom of the housing.
Access and Clean the Blower Wheel Housing
For a true deep clean, you need to reach the blower wheel. On models where the lint trap is at the front (just inside the door), remove the screws securing the front panel or the internal lint duct cover. Carefully detach any door switch wiring harnesses and lift the front panel off. You will now see the plastic or metal ducting that routes air from the drum to the blower motor. Remove the screws holding this duct in place and pull it away. Use your vacuum and brush to thoroughly clean the blower wheel blades and the surrounding cavity. You'll likely find a dense, compacted layer of lint here that looks like felt.
Tip: In California garage installations, temperature swings can cause condensation inside the dryer. This moisture turns lint into a papier-mâché-like paste on the blower wheel. Use a stiff nylon brush to gently scrub it off the wheel blades.
Clean the Moisture Sensors
While you have the lint housing exposed or the door open, locate the moisture sensors. These are usually two curved metal strips located on the lint filter housing or just inside the drum near the front bulkhead. Over time, dryer sheets and fabric softeners coat these sensors in a clear, waxy film, causing the dryer to shut off before the clothes are actually dry. Dampen a microfiber cloth with isopropyl rubbing alcohol and vigorously wipe down the metal strips until they are squeaky clean.
Tip: Cleaning the moisture sensors is the number one secret to fixing a dryer that chronically under-dries clothes on 'Auto-Dry' cycles.
Reassemble and Run a Test Cycle
Once the internal housing, blower wheel, and chute are completely clear of lint, begin reassembling the dryer. Screw the internal ductwork back into place, reattach the front panel (remembering to plug the door switch harness back in), and snap or screw the top panel back down. Insert the fully dried lint screen. Plug the dryer back into the wall outlet. Turn the dryer on and run a 10-minute 'Air Fluff' (no heat) cycle to blow out any remaining microscopic dust particles through the exhaust vent.
⚠ Warning: Double-check that all internal duct screws are tight. If the internal lint housing isn't sealed properly against the blower, the dryer will pull dust from the room instead of air through the drum, severely impacting performance.
Brand-specific notes
Some brands have known design quirks worth knowing about before you start.
LG
Newer front-load matching LG dryers often feature a two-piece folding lint screen. Because of the folding hinge, lint frequently bypasses the screen and packs tightly into the bottom of the housing, right over the moisture sensor bars. You must vacuum this lower cavity thoroughly to prevent 'check filter' error codes.
Samsung
On Samsung models, the lint housing is located at the front bulkhead. To do a proper deep clean, you usually need to remove the top panel, the control board console, and the front panel to fully access the blower housing where lint heavily cakes up around the thermistor.
Whirlpool
Older 29-inch wide Whirlpool, Kenmore, and Maytag dryers have a top-mounted lint screen that pulls out from the top right. The lint chute runs all the way down the back of the machine. You have to remove the rear metal panel of the dryer to properly access and vacuum out this long, vertical chute.
GE
Many GE front-load style dryers have a plastic lint filter housing that screws directly into the front internal bulkhead. When removing this housing to clean the blower wheel, be extremely careful not to strip the plastic screw threads during reassembly, or you'll create an internal air leak.
Bosch
Compact condensation (ventless) dryers, which are incredibly common in Los Angeles and San Diego condos, have complex lint trap systems. You must clean both the primary door filter and the secondary base filter/heat exchanger area at the bottom left of the machine, as these units do not vent lint outside.
What our techs see most often
In the winter months when Southern California actually gets some rain and the marine layer rolls in, we see a massive spike in blown thermal fuses. 90% of the time, the root cause is an internal lint trap housing completely choked with damp lint from a garage-installed dryer, causing the unit to suffocate and overheat.
When to call a professional
- → You smell gas at any point while moving a gas dryer to access the panels.
- → You open the cabinet and find burnt wiring, scorched metal, or melted plastic inside the lint housing area.
- → The dryer continues to overheat, take multiple cycles to dry, or blow thermal fuses even after a deep internal clean.
- → You have a stacked washer/dryer unit in a tight closet and cannot safely move the heavy appliances to access the necessary panels.
- → You discover that the internal lint ducting is cracked, broken, or missing seals and needs structural replacement.
Related Dryer Troubleshooting
These troubleshooting guides cover problems this task can help solve.
Dryer Drum Not Spinning: Causes and Fixes
Dryer Making Loud Noises: Identify Squeaks, Thumps, and Grinding
Dryer Not Heating: How to Diagnose and Fix
Dryer Overheating and Stopping Mid-Cycle: How to Fix
Dryer Takes Too Long to Dry: Fix Guide
Frequently asked questions
How often should I deep-clean the internal lint housing?
For an average household, you should perform a deep internal clean once a year. If you have multiple pets, a large family, or use the dryer heavily, twice a year is recommended. Doing this yourself saves the typical $150-$250 cost of a professional preventative maintenance call.
Why is the lint inside my dryer slightly damp or sticky?
This is very common in California garage installations. Coastal humidity, marine layers, or cold overnight garage temperatures cause condensation inside the metal dryer vent. When dry lint hits this moisture, it turns into a sticky paste that clings to the blower wheel and housing.
Can I just use a leaf blower to blow the lint out from the front?
Absolutely not. Using a leaf blower forces lint backward into the dryer cabinet, coating the motor windings and the red-hot heating element. This is a massive fire hazard and a fast way to destroy the dryer's motor.
What if my lint screen has a small rip in the mesh?
Replace it immediately. A replacement screen usually costs between $20 and $40. Even a tiny tear allows a massive amount of lint to bypass the trap, quickly clogging the internal blower wheel and your home's exhaust ducting, leading to overheating and potential fires.
How much does a professional dryer vent and internal cleaning cost?
If you hire a professional appliance or vent cleaning service in California, expect to pay between $125 and $250. The cost can be higher if your roof vent is difficult to access or if the dryer requires extensive disassembly.
Related Repair Guides
Dryer Takes Too Long to Dry: Fix Guide
When your dryer technically works but a single load takes two or three cycles to come out dry, you are not dealing with a broken part — you are dealing with restricted airflow. Lint, kinked vents, and a dirty moisture sensor are responsible for the vast majority of slow-drying complaints, and almost all of them are 30-minute fixes with no parts at all.
Dryer Not Heating: How to Diagnose and Fix
A dryer that tumbles but produces no heat is almost always one of three problems: a clogged exhaust vent, a blown thermal fuse, or a failed heating element (electric) or igniter (gas). The vent is the most common cause and the most dangerous to ignore — restricted airflow is the #1 trigger for dryer fires in U.S. homes.
Dryer Overheating and Stopping Mid-Cycle: How to Fix
An overheating dryer is more than just a nuisance—it is a serious fire hazard. If your dryer gets blazing hot to the touch and shuts off mid-cycle, here is how to find the airflow blockage or faulty thermostat causing the issue.