At a glance
Symptoms
- • Burner clicks continuously even when the knob is turned to the off position.
- • You smell gas and hear no clicking when trying to light a specific burner.
- • Weak, yellow, or intermittent spark instead of a strong, fast blue spark.
- • One burner won't ignite, but the other burners spark and light perfectly.
- • All burners fail to spark simultaneously (usually points to the spark module).
- • Visible hairline crack on the white ceramic base of the burner electrode.
Common causes
- • Prevents dangerous raw gas buildup in your kitchen from unlit burners.
- • Stops the annoying, continuous clicking sound that can eventually burn out the spark module.
- • Restores the convenience of automatic ignition, avoiding the need for matches or lighters.
- • Resolves electrical shorts caused by liquid spills (like coastal humidity condensation or LA hard water boil-overs) corroding the electrode.
- • Ensures your cooktop operates safely as designed by the manufacturer.
Safety First — Read Before You Start
- •GAS DANGER: Never attempt to remove, modify, or loosen the main gas supply line or internal gas valves. If you smell gas when the stove is off, evacuate and call SoCalGas or PG&E immediately.
- •ELECTRICAL SHOCK: Gas stoves use 120V electricity to generate the high-voltage spark. Always unplug the stove or flip the circuit breaker before opening the cooktop.
- •SHARP EDGES: The sheet metal beneath the cooktop can be razor-sharp. Wear protective gloves when reaching inside the chassis.
- •FRAGILE CERAMIC: The white ceramic base of the igniter electrode is very brittle. Handle it gently to avoid cracking it during installation.
Tools & supplies you'll need
- Screwdriver set (Phillips and flathead)
- Torx or square-drive bit set (depends on brand)
- Needle-nose pliers
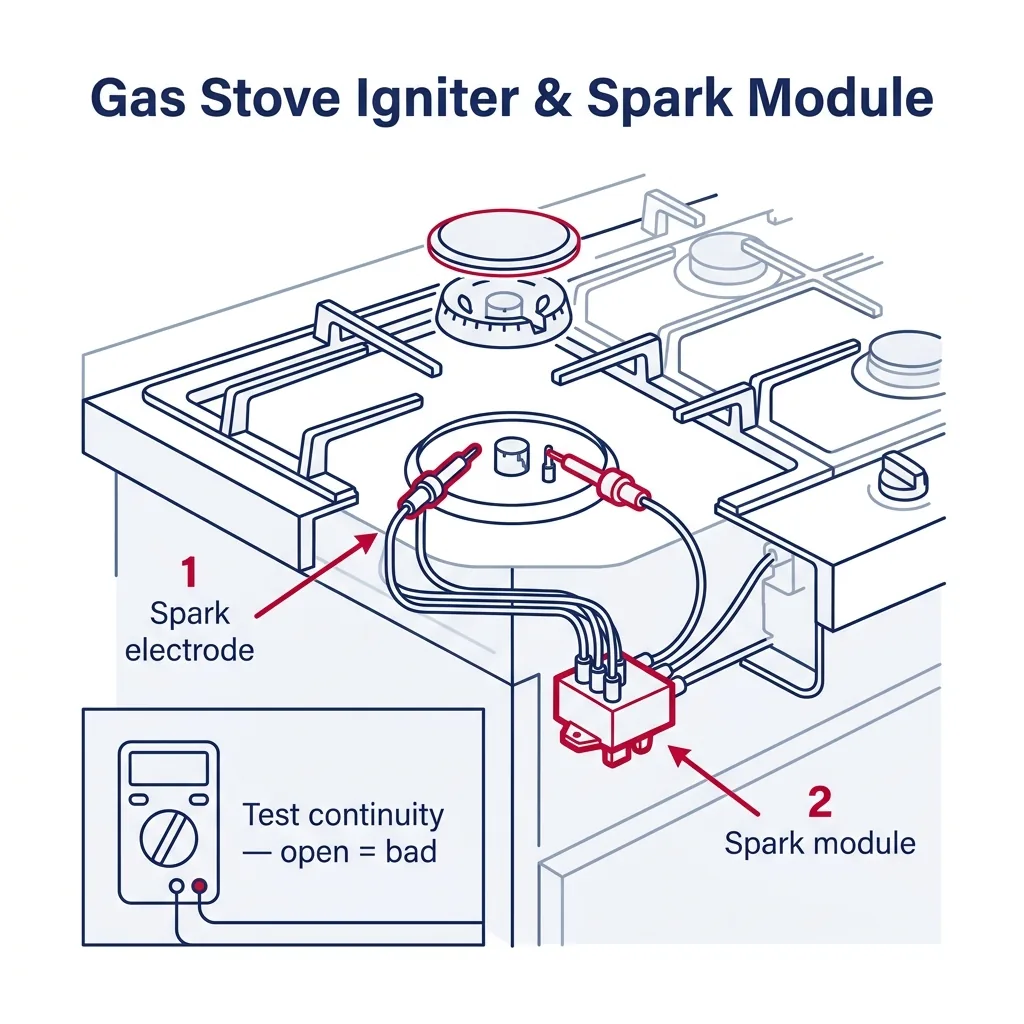
- Multimeter (for testing continuity)
- Small wire brush or fine sandpaper
- Penetrating oil (WD-40 or similar for stuck screws)
- Work gloves and safety glasses
Step-by-step instructions
Disconnect Power and Gas Supply
Safety first. Unplug the stove from the wall outlet. If it's a hardwired unit or the plug is inaccessible, flip the dedicated circuit breaker in your electrical panel. Next, locate the gas shut-off valve behind the stove and turn it a quarter-turn so the handle is perpendicular to the pipe. This ensures no accidental gas release while you are working.
⚠ Warning: Never skip disconnecting the power. The spark module generates high voltage that can deliver a severe shock, even if the stove knobs are turned off.
Remove Burner Grates, Caps, and Bases
Clear the cooktop by lifting off all heavy cast-iron grates, burner caps, and burner heads. Set them aside. To access the igniter electrode, you will usually need to unscrew the burner base from the cooktop. Use the appropriate Torx or Phillips screwdriver. If the screws are rusted from boil-overs or hard water scaling, apply a drop of penetrating oil and let it sit for 15 minutes before attempting to turn them to avoid stripping the heads.
Tip: Keep a magnetic parts tray nearby to hold the small screws. They are easy to lose and often specific to each burner size.
Access the Igniter Electrode or Spark Module
If you are replacing a single spark electrode (the small ceramic piece at the burner), you can usually lift it straight out of the burner base once the screws are removed. If you are replacing the main spark module (the control box that sends power to all electrodes), you will need to access the back of the stove. Pull the stove away from the wall and remove the upper rear sheet metal panel to locate the module, which is typically a small plastic box with several wires attached.
Tip: Before disconnecting any wires from the spark module or the burner switches, take a clear photo with your phone. This ensures you reconnect the high-voltage wires to the exact same terminals.
Remove the Faulty Component
For an electrode: Gently pull the wire connector off the bottom of the ceramic igniter using needle-nose pliers. Do not pull by the wire itself, or you may tear it. For a spark module: Unplug the wire harnesses one by one. Remove the mounting screws or depress the plastic retaining tabs holding the module to the stove chassis, and pull the module free.
⚠ Warning: If the wire slips down into the cooktop chassis while removing an electrode, you may have to lift the entire cooktop frame to retrieve it. Use a binder clip to secure the wire to the cooktop hole so it doesn't fall in.
Install the New Igniter or Module
Connect the wire to the bottom terminal of your new electrode (part cost is usually $15-$30). Carefully seat the ceramic body into the slot on the burner base, ensuring it sits flush and isn't stressed. If installing a new spark module ($40-$80), snap it into the mounting bracket and reconnect the wires exactly as shown in your reference photo. Ensure all connections are tight; loose connections will cause weak or intermittent sparking.
Tip: Handle the new ceramic electrode with care. Even a microscopic hairline crack from dropping it on the counter will cause the high-voltage spark to arc to the chassis instead of the burner cap.
Reassemble the Cooktop Components
Reattach the burner bases using the original screws. Do not overtighten, as the aluminum threads can strip easily. Place the burner heads and caps back into their exact positions. The burner caps must sit perfectly flat; if they are tilted, the spark will not ground properly, and the burner won't ignite.
Tip: Take a moment to clean the bottom of the burner caps with a wire brush. Carbon buildup or grease here can prevent the spark from grounding.
Restore Power and Test the Burners
Turn the gas valve back on and plug the stove into the wall outlet. Turn each burner knob to the 'Lite' position one at a time. You should hear a rapid, crisp clicking sound and see a strong blue spark jump from the electrode to the burner cap, followed by immediate ignition. Test all burners to ensure the spark module is functioning correctly across the entire cooktop.
Brand-specific notes
Some brands have known design quirks worth knowing about before you start.
Samsung
On the popular NX58 series, the ceramic electrodes are notoriously brittle. If you are aggressive when scrubbing the cooktop, you can easily cause a hairline crack. Once cracked, the spark arcs downward into the base instead of upward to the cap.
LG
For LG slide-in ranges (like the LSG series), the spark module is usually buried deep in the back. You will absolutely need to pull the oven away from the wall and remove the rear access panel. Be careful with the delicate wire harnesses when doing so.
Whirlpool
Many Whirlpool and KitchenAid cooktops use a unified spark wire harness. If one wire shorts out or breaks, you cannot just replace a single wire; you often have to replace the entire multi-wire harness assembly, which runs about $60-$90.
GE
GE Profile cooktops frequently suffer from seized burner base screws due to spill corrosion. Do not force them! Soak them in penetrating oil for at least 15-30 minutes. Stripping a Torx screw here turns a 45-minute DIY job into a massive headache.
Bosch
High-end Bosch gas cooktops have very sensitive grounding requirements. If you install a new igniter and it sparks but the burner won't light, ensure the brass burner cap is perfectly clean and seated. The system relies heavily on that pristine metal-to-metal contact.
What our techs see most often
Here in LA and Orange County, about 40% of the 'igniter' calls we get are actually just hard water deposits from boiled-over pasta water shorting out the ceramic electrode. If a good scrub with a wire brush and some rubbing alcohol doesn't fix the clicking, swapping the $20 electrode is your next best bet before assuming the whole spark module is fried.
When to call a professional
- → You smell gas even after the stove is turned off and the room is ventilated.
- → The burner base screws are completely stripped or rusted, preventing cooktop removal.
- → You have replaced the igniter and spark module, but the stove still constantly clicks or fails to spark.
- → The repair requires disconnecting, bending, or moving internal aluminum gas tubing.
- → The appliance is a built-in high-end unit (like Sub-Zero/Wolf) where accessing the spark module requires removing the entire heavy unit from custom cabinetry.
Related Stove Troubleshooting
These troubleshooting guides cover problems this task can help solve.
Electric Stove Burner Not Heating: How to Fix
Gas Stove Keeps Clicking: How to Stop It
Gas Stove Burner Won't Ignite: Causes and Fixes
Cracked Glass Cooktop: What to Do and When to Replace
Frequently asked questions
How much does it cost to replace an igniter vs. the spark module?
A single ceramic igniter electrode typically costs $15 to $30. If the main spark module (the control board generating the spark) is dead, expect to pay $50 to $120 for the part. Professional replacement generally ranges from $175 to $250 including labor, parts, and a safety diagnostic.
Why does my stove keep clicking after the burner is lit?
This is usually caused by moisture or grease around the igniter, a cracked ceramic insulator, or a faulty spark ignition switch located on the burner valve behind the knob. The system doesn't realize the flame is lit, so it keeps trying to ignite.
Can I light my gas stove manually if the igniter is broken?
Yes, in most cases, you can use a long multi-purpose lighter. Turn the gas knob to the 'Lite' position, carefully apply the flame to the edge of the burner, and pull your hand back as it catches. However, this is a temporary workaround and you should fix the igniter for safety.
How do I know if the problem is the electrode or the spark module?
If only one burner won't spark, the issue is almost certainly the individual electrode or its specific wire. If *none* of the burners spark, or if the clicking is weak and erratic across all burners simultaneously, the main spark module or the power supply is usually the culprit.
Are spark modules universal?
No. While they operate on similar high-voltage principles, spark modules are designed with specific mounting brackets, terminal layouts, and varying numbers of burner outputs (e.g., 4-point vs. 5-point modules). Always order the exact OEM part for your specific model number.
Related Repair Guides
Gas Stove Burner Won't Ignite: Causes and Fixes
When you turn the stove knob and hear clicking but see no flame, or hear nothing at all, your gas burner needs attention. We will walk you through diagnosing and fixing the most common ignition failures safely, from simple clogs to electrical faults.
Gas Stove Keeps Clicking: How to Stop It
A gas burner that clicks endlessly without lighting — or one that won't stop clicking even after you turn it off — is usually a moisture or alignment problem, not a broken part. Most fixes are housekeeping and take under 30 minutes. The underlying spark module is rarely the problem on the first complaint, but constant moisture exposure can eventually take it out.
How to Clean Gas Stove Burner Caps and Heads
A quick, routine maintenance task to keep your gas stove lighting reliably and burning with a crisp blue flame. We'll show you how to safely soak, scrub, and realign your burner components without damaging the delicate gas ports.