At a glance
Symptoms
- • Water pooling on the kitchen floor directly beneath the front of the dishwasher door.
- • Visible tears, cracks, or missing chunks in the rubber seal surrounding the dishwasher tub.
- • The gasket feels hard, brittle, or overly compressed instead of soft and pliable.
- • Steam escaping from the sides or top of the door during the high-heat wash or dry cycles.
- • The dishwasher door latch feels unusually loose or lacks resistance when closing.
- • Hard water scale buildup heavily encrusting the rubber, causing it to lose its sealing properties.
Common causes
- • Preventing costly water damage to custom cabinetry, baseboards, and hardwood flooring.
- • Maintaining energy efficiency by keeping steam and heat safely contained inside the tub.
- • Avoiding mold and mildew growth in the toe-kick area caused by slow, unnoticed, long-term leaks.
- • Counteracting the effects of hard water buildup, which is especially common in Southern California and degrades rubber over time.
- • Restoring proper wash pressure, as a compromised seal can slightly reduce the internal pressure dynamics of the tub.
Safety First — Read Before You Start
- •Always unplug the dishwasher or flip the circuit breaker before starting; water and electricity are a dangerous combination.
- •Allow the dishwasher to cool completely if it recently ran a cycle. The interior tub and exposed heating elements can cause severe burns.
- •Be cautious of sharp metal edges along the stainless steel tub lip when pressing the new gasket into the channel.
- •Never use sharp tools to force the new gasket into place, as you can easily puncture the new rubber and ruin the seal.
- •If you notice any exposed wiring or electrical damage near the door latch while working, stop immediately and call a professional.
Tools & supplies you'll need
- Replacement OEM dishwasher door gasket ($15-$45)
- Needle-nose pliers
- Mild dish soap or warm water
- Soft cleaning cloth, sponge, or old toothbrush
- Hairdryer (optional, for softening the new gasket)
- Small flathead screwdriver (for gentle prying if needed)
Step-by-step instructions
Prepare the Appliance and Workspace
Safety always comes first. Begin by disconnecting the power to the dishwasher, either by unplugging it from under the sink or flipping the dedicated circuit breaker in your electrical panel. Open the dishwasher door fully and remove the lower dish rack entirely. Set the rack aside to give yourself unobstructed access to the perimeter of the dishwasher tub. If the interior of the tub is wet or slick with residual detergent, wipe down the edges with a dry towel so you have a firm grip while working. Taking a moment to organize your workspace will make the rest of this task significantly easier.
Tip: Place a dry towel on the floor beneath the open dishwasher door to catch any stray water drops or debris that might fall during the repair.
Examine and Remove the Old Gasket
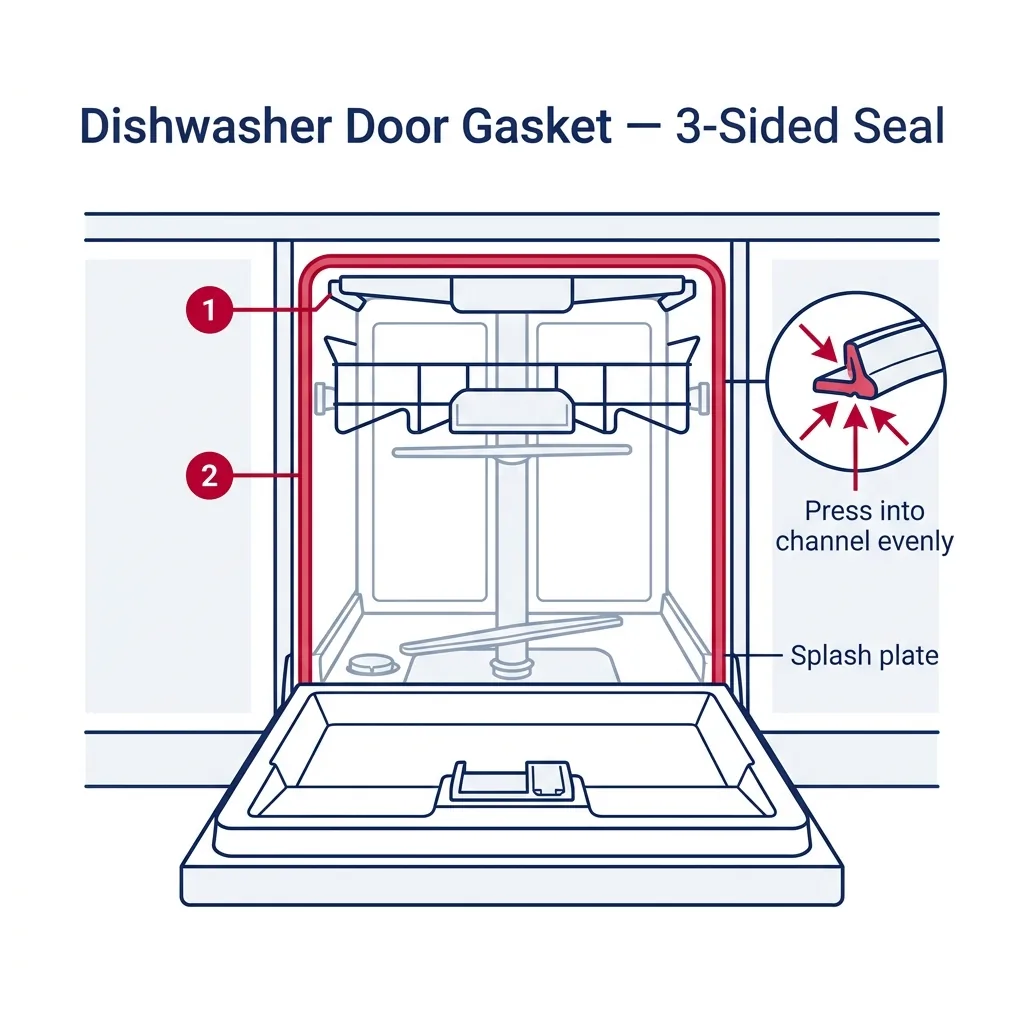
Before you pull the old seal out, take a close look at how it is currently seated. Notice which direction the ribbed or folded side is facing (usually pointing inward toward the tub) and exactly where the gasket ends at the bottom on both sides. Most tub gaskets do not form a complete loop; they run up one side, across the top, and down the other side, ending an inch or two above the bottom of the tub. To remove it, grab one of the bottom ends with your fingers or a pair of needle-nose pliers and gently pull it straight out of the channel. Continue pulling along the perimeter until the entire gasket is free.
⚠ Warning: Do not yank the gasket violently. If it has degraded significantly, it may break into small pieces, forcing you to dig out the remnants from the channel with a screwdriver.
Thoroughly Clean the Gasket Channel
This is arguably the most critical step for ensuring a watertight seal. Over years of use, detergent residue, food particles, and hard water scale build up inside the mounting channel. Here in Southern California, where water hardness can range from 250 to 400 ppm, calcium deposits are a major culprit for gasket failure. Mix a solution of warm water and mild dish soap. Using an old toothbrush or a soft cloth wrapped around a small flathead screwdriver, scrub the inside of the track completely clean. Once the debris is removed, wipe the channel down with a dry cloth. The track must be completely dry and free of grime before the new gasket is installed.
Tip: If you encounter stubborn hard water scale, a Q-tip dipped in standard white vinegar can help dissolve the calcium deposits quickly.
Prepare the New Gasket for Installation
When you unbox your new OEM door gasket, you will likely notice that it is tightly coiled or folded, leaving it with kinks and creases. A cold, stiff gasket is difficult to install and won't seat properly in the channel. To relax the rubber, you have two options: either soak the entire gasket in a sink full of hot (not boiling) water for about 10 to 15 minutes, or lay it out flat and gently warm it with a hairdryer on a low setting. If you use a hairdryer, keep it moving to avoid melting the rubber. Once the gasket feels soft, pliable, and the creases have smoothed out, dry it off completely.
Tip: Always verify you have the correct OEM part number for your specific model. Universal gaskets rarely provide a reliable long-term seal.
Install the New Gasket (Starting at the Top Center)
To ensure the gasket is evenly distributed, fold it in half to find the exact center point. Press this center point into the very top middle of the dishwasher tub channel. Make sure the ribbed or folded edge is facing the correct direction (referencing your mental note from Step 2). Once the center is firmly seated, begin working your way down the left side, pressing the gasket firmly into the track every few inches. Then, return to the top center and work your way down the right side. It is absolutely vital that you do not stretch or pull the gasket as you press it in; stretching the rubber will cause it to bunch up later and create immediate leaks.
⚠ Warning: If you stretch the gasket during installation, you will end up with too much excess at the bottom, and the top corners will eventually pull away from the track.
Seat the Bottom Corners and Check the Fit
As you reach the bottom of the track on both sides, the gasket should naturally end at roughly the same spot the old one did—typically an inch or two above the bottom lip of the tub. Press the ends firmly into place. Run your thumbs along the entire length of the installed gasket to ensure it is seated flush and evenly inside the channel. There should be no ripples, bulges, or twisted sections. If you find a section that looks uneven, gently pull that specific area out and press it back in without stretching.
Tip: Some manufacturers design their gaskets to be slightly longer than necessary. Only trim the excess if your specific appliance manual or the part instructions explicitly tell you to do so. Otherwise, leave it as is.
Test the Seal and Run a Cycle
Reinstall the lower dish rack and slowly close the dishwasher door. You will likely notice that the door requires more force to close and latch than it used to. This is completely normal; the new rubber is thick and hasn't yet compressed to the shape of your door. Leave the door latched for a few hours if possible to help the gasket mold into place. Finally, restore power to the unit and run a short rinse cycle. Grab a flashlight and watch the perimeter of the door closely, especially around the bottom corners, to ensure no water or steam is escaping.
Tip: It may take 2 to 3 full hot wash cycles for the new gasket to fully 'break in' and for the door latch to feel completely normal again.
Brand-specific notes
Some brands have known design quirks worth knowing about before you start.
Whirlpool & KitchenAid
Many Whirlpool and KitchenAid models use a tub gasket with a very distinct lip or ridge. It's crucial that this ridge faces inward toward the tub to properly deflect water. These gaskets are almost always pre-cut to the exact length needed, so if you have excess at the bottom, you have likely stretched it during installation. Pull it out and start over.
Bosch
Bosch dishwashers typically utilize two distinct seals: the main tub gasket (which goes around the top and sides) and a lower sweep or splash shield at the bottom of the door. While the main tub gasket is an easy push-in replacement, replacing the bottom sweep usually requires disassembling the outer door panel. If replacing the tub gasket doesn't stop your leak, the bottom sweep is the likely culprit.
GE
GE Profile and Cafe models sometimes feature a gasket with a specialized ribbed profile or even a magnetic strip embedded in the rubber to help the door seal tightly. When installing a GE gasket, pay close attention to the orientation of the ribs. Using a tiny drop of dish soap on your finger can help lubricate the channel if the new gasket is struggling to slide into the tight groove.
Samsung
Samsung dishwashers are notorious for having incredibly tight gasket channels. Homeowners often struggle to press the new rubber into place without using tools. Resist the urge to use a screwdriver to force it, as you will puncture the rubber. Instead, thoroughly warm the gasket with a hairdryer and use a dab of soapy water to help ease it into the track.
LG
LG replacement gaskets often come with a small colored mark (like a white or yellow dot) indicating the exact center of the seal. This makes the 'start at the top center' step foolproof. LG gaskets are highly susceptible to damage from harsh chemical cleaners, so stick to mild soap and water when performing routine maintenance.
What our techs see most often
We get dozens of calls a week from folks in the Hollywood Hills and coastal OC panicking about ruined hardwood floors from a leaking dishwasher. Nine times out of ten, it's just a $30 door seal that dried out from our famously hard Southern California water—an incredibly easy fix you can knock out before I can even get a tech dispatched to your house.
When to call a professional
- → If replacing the door gasket does not resolve the leak, as the issue could be a warped door, bent hinges, or a cracked lower spray arm forcing water directly at the door.
- → If the lower splash shield (bottom door seal) needs replacing and you are not comfortable disassembling the outer door panel and interacting with the internal wiring.
- → If you spot any signs of electrical damage, scorching, or exposed wiring near the door latch mechanism or user interface.
- → If your dishwasher is a fully integrated built-in model (like a Sub-Zero/Cove or panel-ready Bosch) and you cannot access the seal without removing custom cabinetry panels.
- → If the mounting channel itself is rusted out or physically damaged, preventing the new gasket from staying in place.
Related Dishwasher Troubleshooting
These troubleshooting guides cover problems this task can help solve.
Dishwasher Not Cleaning Dishes Properly: Fix Guide
Dishwasher Door Won't Latch or Stays Stuck: Fix Guide
Dishwasher Not Draining: How to Fix Standing Water
Dishwasher Soap Dispenser Won't Open or Release
Dishwasher Smells Bad: How to Remove Odors
Frequently asked questions
How much does a replacement dishwasher door gasket cost?
An authentic OEM (Original Equipment Manufacturer) dishwasher door gasket typically costs between $15 and $45, depending on the brand and model. We strongly advise against purchasing cheap $10 universal knockoffs online, as they rarely fit the channel correctly and often degrade within a few months.
Why is my dishwasher door so hard to close after replacing the gasket?
This is very common and actually a sign that you've done the job right! The old gasket was flattened and compressed over years of use. The new rubber is thick and resilient. It usually takes 2 to 3 full hot wash cycles for the heat to soften the new rubber and mold it perfectly to the shape of your door.
Should I use glue or silicone sealant to hold the new gasket in place?
Absolutely not. Dishwasher door gaskets are designed to be held in place purely by friction within the mounting channel. Using glue, silicone, or adhesive will not only make future replacements a nightmare, but it can also prevent the gasket from seating properly, causing immediate leaks.
Can I just tape or patch a torn gasket instead of replacing it?
No. The environment inside a dishwasher is incredibly hostile—combining high-pressure water jets, harsh alkaline detergents, and temperatures exceeding 150°F. No tape, waterproof sealant, or patch kit will hold up to these conditions. Replacing the gasket is the only reliable, permanent fix.
What is the difference between a tub gasket and a bottom door seal?
The tub gasket (which this guide covers) is a single, long piece of rubber that runs up the left side, across the top, and down the right side of the dishwasher tub. The bottom door seal (often called a splash shield or sweep) is a separate horizontal piece of rubber located at the very bottom edge of the door itself. Replacing the bottom seal is a more complex job that usually involves taking the door apart.
Related Repair Guides
Dishwasher Leaking Water on the Floor: Causes and Fixes
Water on the kitchen floor in front of or beside the dishwasher is one of the more urgent service calls — every cycle that runs makes the damage worse. The good news is that the source is almost always one of five places: the door gasket, the door itself not closing flush, the water inlet valve, a hose connection, or the float assembly. Most leak sources can be diagnosed in 30 minutes and fixed for under $50.
Dishwasher Door Won't Latch or Stays Stuck: Fix Guide
A dishwasher door that refuses to latch means your cycle won't start and your kitchen cleanup comes to a halt. In this guide, we will walk you through diagnosing and fixing a stubborn door, from clearing simple rack blockages to replacing a faulty latch assembly or tension spring.
How to Clean a Dishwasher Filter (All Brands)
A clogged filter is the number one cause of gritty dishes and foul odors. Learn how to locate, remove, and properly scrub your dishwasher's filter assembly to restore peak cleaning performance and protect your drain pump.