At a glance
Symptoms
- • White chalky film on glassware and the inside of the tub
- • Food particles redeposited on dishes (often on the upper rack)
- • Gritty residue on plates after the cycle
- • Detergent pod or powder still partially undissolved at the end
- • Cloudy glassware that does not clear up with rinsing
- • Dishes on one rack clean, the other rack not — usually the upper rack
Common causes
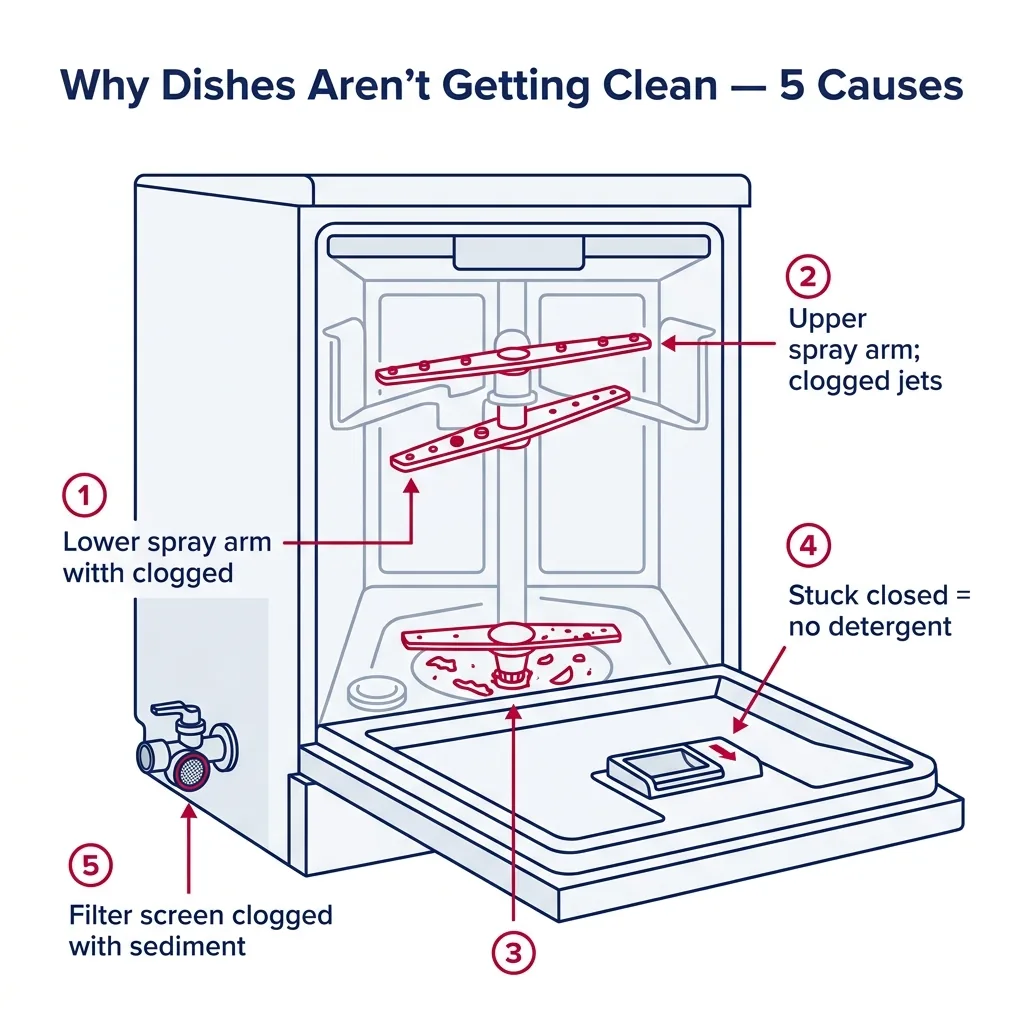
- • Spray arm jets clogged with hard-water mineral scale (the dominant cause in LA, OC, IE)
- • Drain filter clogged — dirty wash water gets recirculated onto your dishes
- • Water inlet valve screen clogged with sediment, restricting fill volume
- • Faulty water inlet valve not opening fully, leaving the unit underfilled
- • Spray arm sagging, cracked, or missing an end-cap
- • Wash impeller worn, no longer producing pressure
- • Soap dispenser stuck closed or detergent caked over the door
- • Water heater set below 120°F so detergent enzymes never activate
- • Loading mistakes — pots blocking the upper spray, items nesting
- • Wrong detergent type (powder in soft water, or expired pods that no longer dissolve)
Safety First — Read Before You Start
- •Turn off power at the breaker and the water supply valve before removing the inlet valve or any internal hose.
- •Hot water during a cycle reaches 140-160°F — wait 20 minutes after a cycle before reaching inside the tub.
- •Do not mix bleach and vinegar when cleaning the tub — chlorine gas is toxic.
- •Never bypass the float switch to "force" more water in — overflow can damage the floor and electrical components.
- •Wear gloves when handling spray arms — accumulated grime is bacterial.
Tools & supplies you'll need
- Phillips screwdriver
- Toothpick or unbent paper clip (for poking out clogged spray jets)
- White vinegar (1 gallon) and citric acid (or lemon juice) for descaling
- Soft brush (old toothbrush works)
- Multimeter (for testing the water inlet valve)
- Bucket and small towel
- Cooking thermometer (to verify hot water temp at the kitchen tap)
Step-by-step instructions
Verify hot water temperature at the kitchen sink
Run the kitchen sink hot water for 60 seconds, then catch a stream in a glass and stick a cooking thermometer in. You want at least 120°F (ideally 125°F). Most modern detergent enzymes do not activate below 120°F, which means dishes come out covered in undissolved soap and food residue regardless of cycle settings. If your water heater is set lower, raise it to 120°F. Always run the kitchen tap until hot before starting the dishwasher — otherwise the first fill is cold tap water sitting in the supply line.
Tip: Tankless water heaters in particular can take 30+ seconds to deliver hot water to the dishwasher. Always run the kitchen sink hot first.
Clean the filter and check the sump
Pull out the lower rack and twist out the cylindrical filter at the bottom of the tub. Lift the flat fine-mesh screen as well. Rinse both under hot water with an old toothbrush — you are scrubbing off baked-on grease, food sludge, and seeds. Reach into the sump (with gloves) and pull out any debris. A clogged filter recirculates dirty wash water through the spray arms — your dishes get washed with food slurry. Clean it monthly going forward.
⚠ Warning: There is almost always a glass shard somewhere in the sump. Use a flashlight and gloves.
Inspect and unclog the spray arm jets
Lift out the lower spray arm (most twist off counter-clockwise; some lift straight up; KitchenAid uses a turn-and-pull collar). Hold it up to a light and look at each tiny hole. In hard-water areas, those holes get glazed over with calcium deposits the color of old eggshells — water passes weakly or sideways. Use a toothpick or straightened paper clip to clear each jet. Then soak the entire arm in 1 part white vinegar to 1 part hot water for 30 minutes. Repeat for the upper spray arm and any third-rack spray (KitchenAid, Bosch 800). Reinstall and confirm both arms spin freely by hand.
Tip: If you can see daylight through every jet after cleaning, you are good. If even a few are still partially glazed, repeat the vinegar soak — half-blocked jets create the lopsided "one rack clean, one rack dirty" pattern.
Descale the entire interior
With the spray arms reinstalled and the dishwasher empty, run a hot cycle with two cups of white vinegar in a glass measuring cup on the upper rack — do not put it in the detergent dispenser. Mid-cycle, the vinegar dumps and circulates through the entire system. Follow with a second empty hot cycle with a cup of citric acid powder (or 1/4 cup of Lemi Shine) sprinkled in the bottom of the tub. This descales the heating element, sump, hoses, and impeller. In LA tap water (averaging 250-350 ppm hardness) we recommend doing this every 2-3 months.
Tip: Bosch and KitchenAid manuals explicitly endorse this monthly maintenance step. Skipping it shortens spray arm life and bakes scale onto the heater coil.
Check the water inlet valve and screen
Turn off power and the water supply. Remove the bottom kick-plate. The water inlet valve is on the left or right front, where the copper or braided supply line enters. Disconnect the supply line (have a towel ready), and look inside the inlet — there is a small mesh screen that traps sediment. In areas with old galvanized pipes or after recent plumbing work, this screen clogs solid with rust flakes. Clean it under running water; if it is corroded through, replace the entire valve ($35-60 part). With a multimeter, also test the valve solenoid for continuity — should read roughly 500-1500 ohms. Open or shorted = replace.
⚠ Warning: Always confirm the supply valve is shut off — there is roughly 50 PSI behind that line and you will flood the kitchen if it is not.
Inspect the soap dispenser and dispenser timing
Watch the unit run a wash cycle through a clean window if you have one (Bosch 800 series 3rd-gen has a small light), or pause the cycle 10 minutes in and check whether the detergent door has opened. If the pod is still sitting in a closed dispenser, the door spring is weak or jammed by old detergent residue. Clean the dispenser cavity with hot water and a toothbrush, work the door open and closed, and replace the bi-metal release on the dispenser if it does not actuate (~$45 part). Also confirm you are not loading items in front of the dispenser door — silverware baskets in the wrong spot block the door from opening.
Tip: Switch from gel pods to powder detergent for one wash cycle. If results suddenly improve, your old pods were not dissolving — pods over 12 months old or stored in a humid garage degrade and fail to break apart.
Check spray arms for cracks, sags, and missing end caps
With the arms removed, look for cracks along the seams, missing end caps, or warping (a sag means the arm is dragging on the bottom). Also check that the upper-rack spray arm receives water — there is a small rubber gasket on the docking nipple where water transfers from the tub wall to the rack. A worn gasket lets water spray everywhere except up. Replacement arm: $40-90. Replacement gasket: $5-15. Snap a new one in and the upper rack will clean dramatically better.
Brand-specific notes
Some brands have known design quirks worth knowing about before you start.
Bosch
Bosch 300, 500, and 800 series (SHE, SHX, SHP) have a self-cleaning filter that lulls owners into never opening it — but the filter still needs manual cleaning every 2-3 months in hard-water areas. The 3rd spray arm on 800-series models has the smallest jets in the industry and is the first to glaze over. Soak it separately in vinegar. Mid-range Bosch (SHX55, SHE53 from 2018-2022) had a known issue with sediment accumulating in the wash pump that reduces water pressure to the upper rack — pulling and cleaning the pump cover restores pressure.
KitchenAid
KitchenAid KDTM, KDTE, and KDPM series share a Whirlpool platform with a chopper blade in the sump. When the chopper jams (labels, fruit pits, fish bones), wash performance drops dramatically because food slurry recirculates. Pop the chopper cover and clear the blade. Also: KitchenAid third-rack spray jets are the same diameter as a sewing needle; they will glaze in 18 months in LA tap water without descaling.
Samsung
Samsung DW80, DW60, and StormWash series have linear-spray bars on top that depend on a high water-flow rate. A weak inlet valve makes them barely move — confirm the valve is delivering full flow before blaming the bar. Samsung tubs also have a known issue with detergent residue caking on the door gasket and dispenser; a monthly hot vinegar cycle keeps the dispenser door spring working.
GE Profile
GE Profile PDT, PDW, and Cafe CDT series have an "ultra-fine filtration" system that needs more aggressive manual cleaning than the manual suggests — every 4-6 weeks. The bottle-jet feature on these models clogs first; remove the silicone tip and rinse it under hot water. GE's dry cycle is heat-dependent — if dishes come out wet AND dirty, suspect the heating element (also descales matter for heat transfer).
Whirlpool
Whirlpool WDT, WDF, and WDTA series are the most forgiving of hard water but the most sensitive to loading errors. Tall items in the upper rack block the rotating wash arm. Whirlpool also still uses a removable chopper assembly — clear it once a year. Heating element style on these (exposed coil at the bottom) is a magnet for scale; descale every 2 months in LA.
What our techs see most often
Hard water is the silent killer of dishwashers in LA, Orange County, and the IE. Tap water in places like Pasadena, Glendale, Anaheim, and parts of Riverside runs 250-400 ppm hardness — three to four times what these machines are designed for. We see "won't clean" calls every week where the spray arm jets are 70% blocked with calcium and the homeowner blames the detergent. The fix is almost always a vinegar descale and a paper-clip jet cleaning. We recommend every customer in our service area run a citric-acid descale cycle every 60 days — adds 3-5 years to the life of the unit.
When to call a professional
- → You have descaled, cleaned filters, and confirmed water temperature — and dishes still come out dirty
- → The water inlet valve is replaced but the unit still underfills
- → Wash motor (not drain motor) is running but no water pressure reaches the spray arms
- → There is a leak somewhere internal that you cannot trace from the kick-plate
- → Heating element is visibly broken or burned (no dry cycle, often paired with poor wash)
- → Control board does not respond to wash-cycle commands or skips heat phase
Dishwasher Maintenance & Replacement Tasks
Step-by-step guides for individual maintenance jobs related to this appliance.
How to Clean a Dishwasher Filter (All Brands)
How to Clean Dishwasher Spray Arms (Unclog the Jets)
How to Descale a Dishwasher with Vinegar or Citric Acid
How to Replace a Dishwasher Door Gasket
Frequently asked questions
Why are my dishes coming out with white film?
White film is hard water mineral deposits — calcium and magnesium that did not get rinsed off during the cycle. The fix is twofold: (1) add a rinse aid like Jet-Dry to reduce surface tension on the dishes, and (2) run a citric-acid descale cycle every 60 days. In LA tap water this is non-negotiable; without descaling, your spray arms glaze over within a year.
Should I pre-rinse my dishes before loading?
No. Modern dishwashers (post-2015) are designed to detect food load via turbidity sensors and need food residue to activate detergent enzymes. Scrape large debris into the trash but do not rinse plates clean — pre-rinsing actually reduces wash performance. The exception: dishes sitting in a half-loaded dishwasher for more than 2 days will dry food on, so run a "rinse only" cycle if you wait that long.
How often should I clean my dishwasher filter?
Once a month at minimum, every 2 weeks if you are running it daily or rarely scrape plates. A clogged filter recirculates dirty water through the spray arms — your dishes get rinsed in the previous cycle's slurry. This is the single most overlooked cause of poor cleaning.
My dishwasher is on a softened water line — do I still need to descale?
Less often, but yes. Even softened water leaves trace mineral residue, and detergent salts build up on the heating element regardless of softener output. In a softened-water home, a vinegar cycle every 4 months is usually sufficient. In hard-water homes (most of LA without a softener), every 6-8 weeks.
Is it cheaper to buy a new dishwasher than fix one that does not clean?
Almost never, if the unit is under 10 years old. A descale cycle is free, a new spray arm is $40-90, a new water inlet valve is $35-60. A wash motor replacement runs $250-350 installed. New mid-range dishwasher: $700-1100 plus install. We recommend repair unless the unit is 12+ years old or the wash motor and control board both need replacing.
Related Repair Guides
Dishwasher Not Draining: How to Fix Standing Water
A pool of dirty water sitting at the bottom of your dishwasher after a cycle is one of the most common service calls we get. The good news: roughly 7 out of 10 cases trace back to a clogged garbage disposal connection or a blocked filter — both of which you can fix in under an hour without any special tools.
Dishwasher Leaking Water on the Floor: Causes and Fixes
Water on the kitchen floor in front of or beside the dishwasher is one of the more urgent service calls — every cycle that runs makes the damage worse. The good news is that the source is almost always one of five places: the door gasket, the door itself not closing flush, the water inlet valve, a hose connection, or the float assembly. Most leak sources can be diagnosed in 30 minutes and fixed for under $50.
How to Clean a Dishwasher Filter (All Brands)
A clogged filter is the number one cause of gritty dishes and foul odors. Learn how to locate, remove, and properly scrub your dishwasher's filter assembly to restore peak cleaning performance and protect your drain pump.