At a glance
Symptoms
- • Water pooling on the floor in front of or under the fridge
- • Water inside the fridge under the crisper drawers
- • Ice forming on the bottom of the freezer
- • Drips coming from the bottom of the door
- • Damp or moldy smell
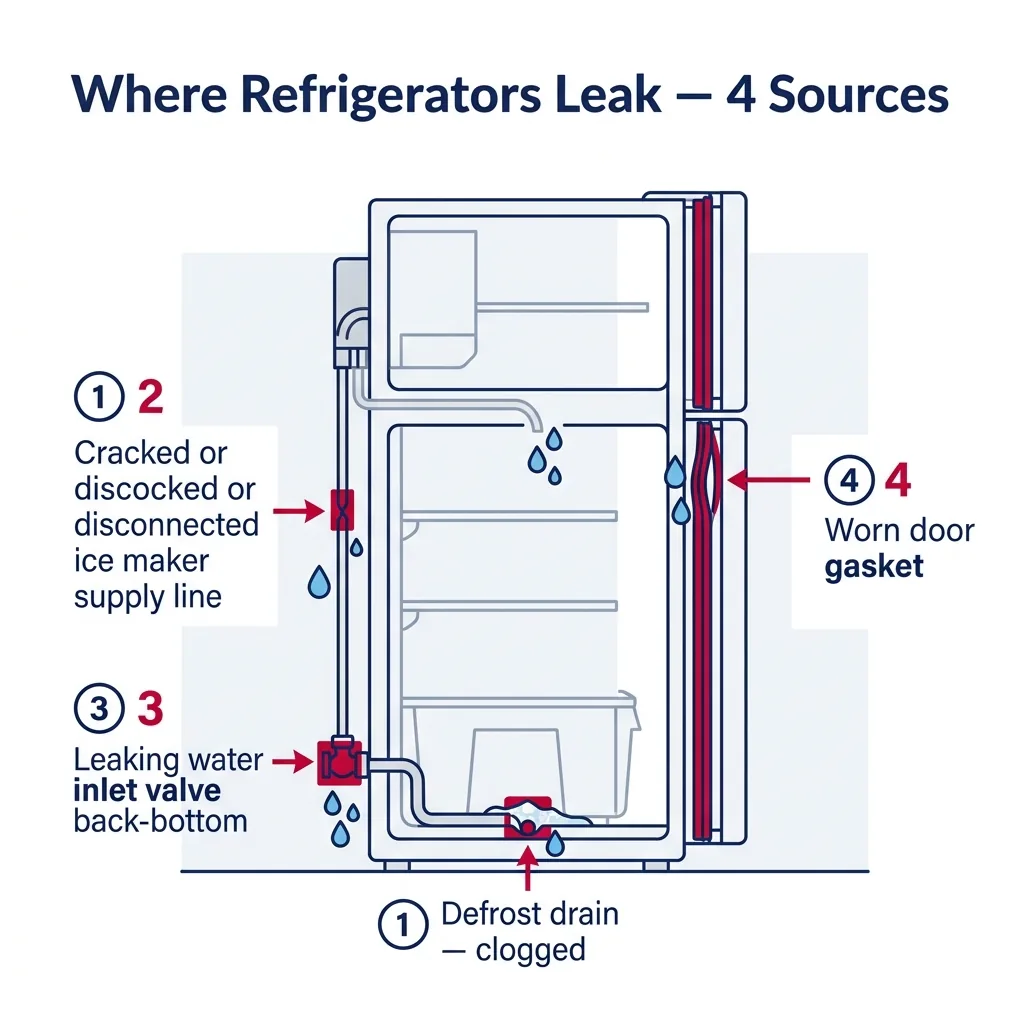
Common causes
- • Clogged defrost drain (frozen ice plug at bottom of freezer)
- • Cracked or disconnected ice-maker / water-dispenser supply line
- • Leaking or stuck-open water inlet valve
- • Failed door gasket allowing humid air in (causing condensation)
- • Drain pan cracked, mispositioned, or overflowing
- • Frost-free defrost system blockage
Safety First — Read Before You Start
- •Always shut off the water supply line before disconnecting fittings.
- •Unplug the fridge before reaching behind for electrical components.
- •Do not use boiling water on the defrost drain — it can crack the plastic.
- •Wipe up water immediately to prevent floor damage and slip hazards.
Tools & supplies you'll need
- Towels and a shallow tray
- Turkey baster or syringe (for clearing the defrost drain)
- Hot water (NOT boiling)
- Phillips screwdriver
- Flashlight
- Small mirror (for inspecting behind unit)
- Pipe wrench (for water-line fittings, if needed)
Step-by-step instructions
Find the source first
Move the fridge out about a foot and dry the floor completely. Wait 4-6 hours and check where new water appears. (a) Front: usually a defrost drain or door seal. (b) Back: water inlet valve or supply line. (c) Inside (under crispers): defrost drain. (d) Inside the freezer (ice on bottom): also defrost drain. Knowing the source narrows the fix.
Tip: Place a paper towel where you suspect the source — it will discolor where water lands and confirm the location.
Clear a clogged defrost drain (most common cause)
Inside the freezer, pull out the bottom drawer or floor panel. Look for a small drain hole at the back. If you see ice covering it or a small ice plug inside the hole, this is your problem. Pour 1-2 cups of WARM (not boiling) water through the drain with a turkey baster. The warm water melts the ice plug. You can also use a length of stiff plastic tubing or pipe-cleaner wire to push the plug down. Behind the fridge, locate the drain pan over the compressor and confirm water reaches it.
Tip: Defrost-drain blockage is the #1 cause of refrigerator water leaks — solve this and 60% of leaks are fixed.
⚠ Warning: If you cannot see the drain hole at all (covered by thick ice), the underlying defrost system is failing. Address that issue (see our "not cooling" guide) before continuing.
Inspect the water supply line
Behind the fridge, follow the small flexible water line from the back of the unit to the saddle valve under the sink or in the basement. Look for visible cracks, a pinhole drip, or a loose compression fitting. Tighten compression nuts gently with a wrench. If the line is plastic and brittle (yellowed, more than 10 years old), replace the entire line with a stainless-steel braided supply line ($15-25 at any hardware store) — these don't crack.
⚠ Warning: Shut off the saddle valve before disconnecting any fittings. Have a bucket and towels ready — there will be residual water.
Check the water inlet valve
The inlet valve is a small electrical solenoid where the supply line connects to the back of the fridge. Look for water dripping from the valve body or where the supply line meets it. Slight weeping at the fittings can be fixed by tightening; water from the body itself means the valve is failing internally and must be replaced ($25-60). To replace: shut off water, disconnect the supply line, unplug the electrical connector, unscrew the valve from its bracket (2 screws), install new valve in reverse order.
Tip: A leaky inlet valve sometimes only drips when the ice maker calls for water, so the leak appears intermittently every few hours.
Inspect the door gasket
Open the door and examine the rubber seal all the way around. Look for cracks, tears, hardened areas, or visible black mold. Also do the dollar-bill test: close the door on a dollar bill and try to pull it out — if it slides out easily, the seal is too weak in that spot. A worn gasket lets warm humid air leak in, which causes condensation that drips down. Wipe the gasket with warm soapy water and let it dry. If the gasket is hardened or torn, order a model-specific replacement ($30-90) and pop it on with the gasket-replacement procedure for your model.
Tip: A hairdryer on low heat can soften a gasket that has stiffened from age — this often improves the seal without replacement.
Verify the drain pan
The drain pan sits under the fridge above the compressor. Normal operation is water from the defrost drain dripping into it and evaporating from compressor heat. If your defrost drain is clear but you still have water on the floor, the pan may be cracked, mispositioned, or full because the compressor isn't running enough to evaporate. Pull out the kick-plate, inspect the pan, empty it if full, and reseat it level.
Brand-specific notes
Some brands have known design quirks worth knowing about before you start.
Samsung
Samsung RF series French-door fridges are notorious for ice forming under the crisper drawers — a known design flaw with the rear-wall drain. Samsung has issued a "drain heater" service kit (~$50 part) that solves it permanently. Check Samsung's service bulletin SVCB-2018-RR-001.
LG
LG ice-and-water dispenser models often leak from the dispenser cap behind the fridge, where the water line tees off. The cap o-ring fails after 5-7 years and weeps slowly — easy fix with a $5 o-ring kit.
Whirlpool
Whirlpool side-by-side models with bottom-front ice makers often leak from a cracked ice-bin housing — water from the ice maker doesn't fully refreeze and escapes. The fix is a replacement bin assembly (~$80).
GE
GE Profile and Cafe French-door fridges sometimes leak from the water reservoir tank inside the rear of the fridge. Symptoms: water inside under the crisper PLUS slow dispenser. The tank is $40-60 and replacement is straightforward.
Sub-Zero
Sub-Zero built-ins have a more complex drainage system with a heated drain to prevent freezing. If the drain heater fails (rare but possible), water will overflow inside. Diagnosis requires a Sub-Zero specialist — incorrect repair can damage cabinetry.
What our techs see most often
In our service area, especially in coastal cities like San Diego and Oceanside, summer humidity worsens defrost-drain clogs because warm humid air enters the freezer faster, creating more condensation that freezes at the drain. We see a noticeable spike in water-leak calls in July and August. Routine defrost-drain flushing every 6 months prevents most of these.
When to call a professional
- → You've cleared the defrost drain, checked all visible water lines, and the leak persists
- → You see water dripping from the compressor area or sealed-system components
- → There's brown or rusty water (indicates internal corrosion)
- → The leak is causing damage to expensive flooring and you cannot stop it quickly
- → Your fridge is a built-in (Sub-Zero, Thermador, Viking) — drain access requires partial disassembly
- → You suspect refrigerant-line condensation rather than water (oily film, hissing sound) — this needs an EPA-certified tech
Refrigerator Maintenance & Replacement Tasks
Step-by-step guides for individual maintenance jobs related to this appliance.
How to Clean Refrigerator Condenser Coils (Step-by-Step)
How to Level a Refrigerator Properly
How to Manually Defrost a Refrigerator or Freezer
How to Replace a Refrigerator Door Gasket (DIY Guide)
How to Replace a Refrigerator Water Filter (All Major Brands)
Frequently asked questions
Why is water pooling under my crisper drawers?
Almost always a clogged defrost drain. Water from defrost cycles cannot drain to the back evaporator pan and instead overflows the freezer floor and trickles down into the fridge section under the crispers. Clear the drain (Step 2) and the issue resolves.
How can I tell if it's water or refrigerant leaking?
Water is clear and odorless. Refrigerant leaks are very rare in modern fridges, but if you see oily residue, smell ammonia, or hear hissing — that is refrigerant and requires an EPA 608-certified tech immediately.
My fridge has been leaking for weeks. Should I be worried about damage?
Yes — chronic moisture under a fridge can damage flooring, cause mold, and rust the compressor housing. Move the fridge out and inspect the floor. Stop the leak immediately and dry thoroughly with fans for 48 hours.
Is the drain pan supposed to have water in it?
Yes, a small amount of water in the drain pan is normal — it evaporates from compressor heat. If the pan is overflowing, the compressor is not running enough (a cooling problem) or the pan is cracked.
How can I prevent refrigerator leaks in the future?
Three things: (1) flush the defrost drain with warm water every 6 months as preventive maintenance, (2) replace the water filter on schedule, (3) replace plastic supply lines with braided stainless-steel before they age out (every 7-10 years).
Related Repair Guides
How to Fix a Refrigerator That's Not Cooling
A refrigerator that runs but does not cool is one of the most common appliance problems we see. Most cases come down to dirty condenser coils, a bad evaporator fan, or a defrost-system fault — and several are fixable in under an hour.
Refrigerator Ice Maker Not Working: How to Fix It
A non-working ice maker is rarely a broken ice maker. In our experience, 8 out of 10 cases come down to a frozen fill tube, a water-supply problem, or a clogged filter — all fixable in 30-60 minutes.
How to Clean Refrigerator Condenser Coils (Step-by-Step)
Keep your refrigerator running efficiently and prevent expensive compressor failures by cleaning your condenser coils. This simple 20-minute task is the single most important maintenance step you can do for your fridge.