At a glance
Symptoms
- • Cycle ends with standing water in the drum
- • Door will not unlock on a front-loader (safety interlock holds shut while water is present)
- • You hear the pump humming but no water moves through the drain hose
- • Washer pauses mid-cycle and displays an "OE", "ND", "F9E1", or "5E" drain error
- • Slow drain — water leaves but takes much longer than usual and clothes are still soaking wet
Common causes
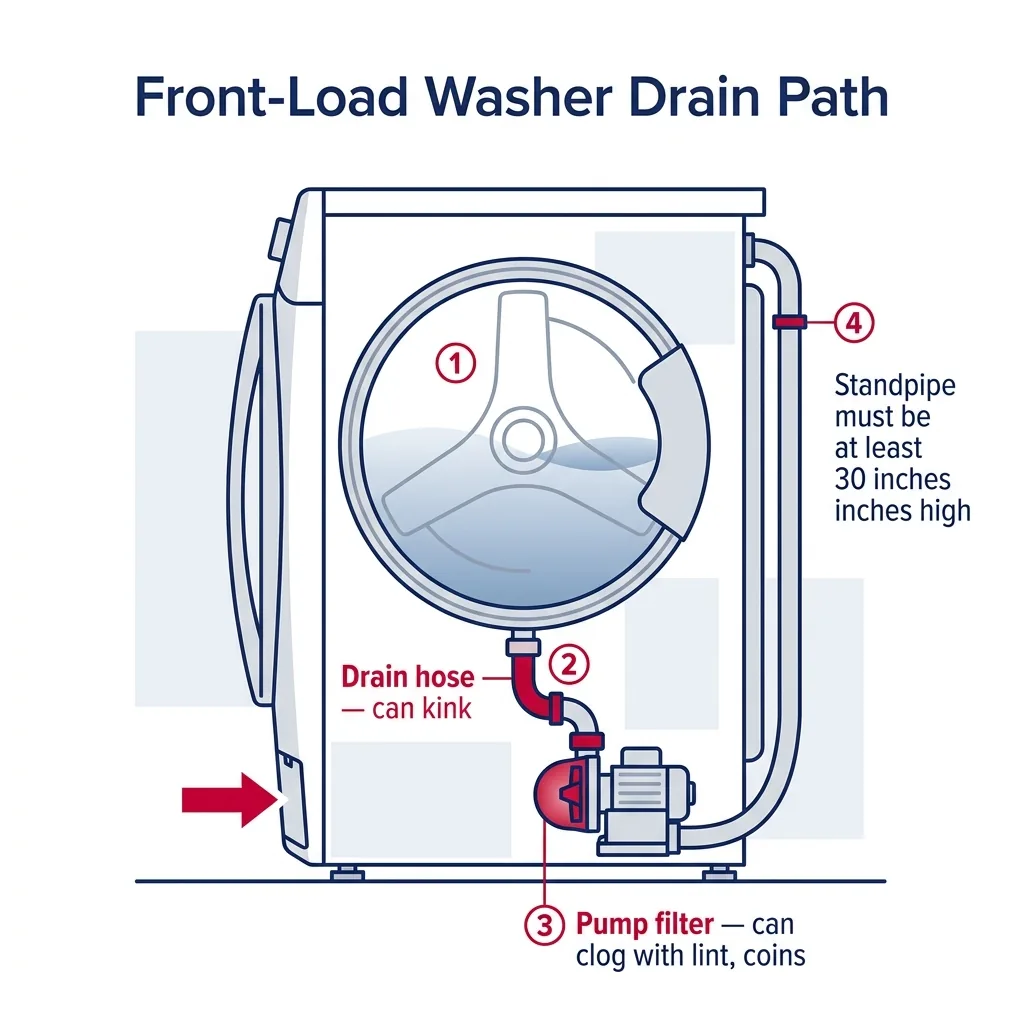
- • Clogged pump filter — coins, hair clips, baby socks, lint, or a single bra underwire are the usual culprits
- • Kinked, crushed, or clogged drain hose behind or under the washer
- • Foreign object lodged in the drain pump impeller, jamming the rotor
- • Failed drain pump motor (windings open, impeller shaft frozen, or thermal cutout tripped permanently)
- • Faulty pressure switch reporting an empty tub before the spin cycle
- • Lid switch or door lock intermittent — washer skips drain because it cannot lock the door
- • Main control board not sending the drain signal (rare but seen on older boards)
Safety First — Read Before You Start
- •ALWAYS unplug the washer before touching the pump, opening the cabinet, or testing electrical components.
- •Bail standing water out of the drum first — a full front-loader holds 3-5 gallons, and that water will pour onto the floor when you open the pump filter.
- •Turn off both hot and cold supply valves before pulling the washer out so you do not snap a hose.
- •Wear cut-resistant gloves when reaching into the pump — broken glass, bra wires, and small metal screws hide in the impeller housing.
- •Do not run the washer with the pump cover removed to "test" it. The pump is wired to mains voltage and water will spray.
Tools & supplies you'll need
- Phillips and flat-head screwdrivers
- Needle-nose pliers (for fishing debris from the pump)
- Multimeter (to test pump windings and pressure switch)
- Shallow drain pan or baking sheet (water will spill)
- Stack of towels and a wet/dry shop vac if available
- Bucket for bailing standing water from the drum
- Flashlight
Step-by-step instructions
Drain the standing water manually
Before any repair, you need an empty tub. On a front-loader, the small access door at the lower-front conceals a pump filter and usually a 6-inch black drain tube with a plug. Place a shallow pan, pull the tube out, and pop the plug — water will gravity-drain in 1-2 minute increments (drain it in stages, the pan will fill fast). On a top-loader without a user filter, bail water with a bucket and sponge, or use a wet/dry vac. Do not skip this step — opening the pump with a full tub creates a flood.
Tip: On most front-loaders the small drain tube has enough length to reach a low pan but not a tall bucket. A jelly-roll pan or oven tray works perfectly.
⚠ Warning: Place towels in a wide arc around the access door. Even with careful draining, expect 1-2 cups of residual water to escape when you remove the pump filter.
Inspect and clean the pump filter
Once water is fully drained, unscrew the pump filter cap by turning it counter-clockwise (it is hand-tight, but stiff after years of use — use a damp rag for grip if needed). Pull the filter out and examine: you will likely find lint mats, coins, hairpins, dog hair, baby socks, and the occasional bra underwire. Clear all debris, rinse the filter under the tap, and check the now-exposed pump cavity with a flashlight. Reach in carefully (gloved) and remove anything still inside. Reseat the filter hand-tight plus a quarter turn — over-tightening cracks the housing.
Tip: Manufacturers recommend cleaning the pump filter every 1-3 months on heavily used machines. Most homeowners have never done it, which is why the average filter we open contains 2-3 years of accumulated debris.
Check the drain hose for kinks and clogs
Pull the washer 12-18 inches away from the wall and trace the gray corrugated drain hose. Look for sharp 90-degree kinks where it disappears into a standpipe or laundry sink — the most common installer mistake is shoving the hose too far down into the standpipe, where it siphons or kinks. The hose top should hang at a 34-96 inch height (per UL standards) and not be pushed deeper than 6 inches into the standpipe. Disconnect the lower end, hold it in a bucket, and run a Drain cycle. If water flows out cleanly, the clog was downstream — in your home plumbing or standpipe.
⚠ Warning: A standpipe clog will back-siphon the dirty water back into the washer the next time it fills. Clear the standpipe with a hand auger or call a plumber before running another cycle.
Test the drain pump motor
If the filter is clean and the hose is clear but the washer still will not drain, the pump itself is suspect. With the washer unplugged, locate the pump (front-loader: behind the front kick-plate, attached to the filter housing; top-loader: under the tub, accessed by tipping the cabinet back). Disconnect the two-wire harness from the pump motor and use a multimeter to read resistance — most washer drain pumps read 10-30 ohms. An open reading (OL) means a burned-out winding, replace the pump (~$45-90). While the pump is accessible, manually spin the impeller with a finger — it should turn freely. If it is locked, a foreign object is jammed inside.
Tip: Most modern washer drain pumps are magnetic-coupled, meaning the impeller can be removed and inspected without disturbing the motor seal. Look for a small clip or twist-lock on the impeller housing.
Verify the pressure switch and air dome tube
The pressure switch tells the control board how much water is in the tub. If it reports empty when the tub is full, the washer skips the drain step entirely. Locate the small clear or black plastic tube running from the bottom-side of the tub up to a cylindrical pressure switch on the upper rear panel. Pull both ends off and blow gently through the tube — if it is full of soap residue or kinked, clean or replace it (~$10 part). On a multimeter, the switch should change continuity between two terminal pairs as you blow into the port. A stuck switch is a frequent cause on Whirlpool and GE top-loaders 6+ years old.
Confirm the lid switch or door lock is signaling correctly
Top-loaders will not drain if the lid switch is open. Front-loaders will not drain if the door lock is not engaged. Press the lid switch manually (top-load) or use a multimeter to confirm continuity through the door lock circuit (front-load). A failed switch is a $20-35 part, and is responsible for roughly 15% of "won't drain" calls in our service area. See our companion guide on washer-not-spinning for switch testing details — the same component prevents both drain and spin.
Brand-specific notes
Some brands have known design quirks worth knowing about before you start.
LG
LG front-loaders (WM3500, WM3900, WashTower) display "OE" for drain failures. The pump filter is at the lower-left of the front panel behind a small flip-down door. LG pumps are robust but the impeller housing collects dryer-sheet residue if customers use them — a cleaning every 6 months prevents almost all "OE" errors.
Samsung
Samsung front-loaders (WF45, WF50) often throw "5E" or "SE" drain errors. A common Samsung-specific failure is the small rubber pump-housing gasket cracking and causing the pump to lose prime — water sits in the tub even though the impeller spins. Replace the gasket kit (~$15) when servicing the pump on any Samsung 5+ years old.
Whirlpool / Maytag
Whirlpool Cabrio and Maytag Bravos top-loaders display "F9E1" for drain failures. A frequent cause is the drain hose being installed too tight against the cabinet, partially crushing it. Check that the hose has a gentle bend with no flattened sections before assuming pump failure.
GE
GE front-loaders (GFW450, GFW650) and the older GTW top-loaders use a pump that thermal-trips after running against a clog. Even after you clear the clog, the pump may not run for 15-30 minutes while it cools. Wait, then retest — many "dead pump" diagnoses are actually a cooled-down pump that works fine.
Bosch
Bosch front-loaders (300, 500, 800 series) have a foam-trap built into the pump filter housing that collects detergent foam. If you use too much HE detergent, the trap fills with foam and blocks drain flow even though the filter looks "clean." Run a Drum Clean cycle with no detergent to flush the trap.
What our techs see most often
Across LA and OC dispatch, "won't drain" is the highest-rate self-fix call we get — when customers send a photo of what they pulled from the pump filter, we often see them solve it themselves before our window even opens. The most common find is a child's sock plus a few quarters in the impeller. Customers in older Spanish-style homes with cast-iron drain plumbing also hit standpipe clogs more often than newer construction — if the washer drains into a bucket but not into the wall, the issue is plumbing, not the washer.
When to call a professional
- → You've cleared the filter, hose, and standpipe and the pump still does not run
- → The pump motor reads open on a multimeter but you are not comfortable replacing it (involves tipping a heavy washer or working in a tight cabinet)
- → You see water leaking from the bottom of the cabinet during the drain phase — the pump housing or hose connections may be cracked
- → Repeated drain failures despite no visible clog — likely a control board issue requiring board-level diagnosis
- → Your washer is a stacked unit (LG WashTower, Samsung FlexWash) and the dryer must be uninstalled to access the pump
- → A burning smell or melted plastic odor is present — stop using the washer and unplug it immediately
Washer Maintenance & Replacement Tasks
Step-by-step guides for individual maintenance jobs related to this appliance.
How to Clean a Washing Machine Drain Pump Filter
How to Remove Mold from a Front-Load Washer Gasket
How to Descale a Washing Machine with Vinegar (Hard Water Fix)
How to Level a Washing Machine to Stop Vibration
How to Replace a Washing Machine Drive Belt
Frequently asked questions
Why is there standing water in my washer after the cycle?
In our experience, about 60% of the time it is a clogged pump filter, 20% a kinked drain hose, 10% a failed pump motor, and 10% miscellaneous (pressure switch, door lock, control board). Always check the filter first — it is the easiest and most common fix, takes 10 minutes, and costs nothing.
How do I drain my washer manually?
Front-load: open the small access door at the lower-front, place a shallow pan, pull out the small black drain tube, and pop the plug. Drain in 1-2 minute stages. Top-load: bail water with a bucket and sponge, or use a wet/dry shop vac through the open lid. Lower the drain hose below tub level if the standpipe is intact — water will siphon out by gravity.
How often should I clean the washer pump filter?
Manufacturers recommend monthly. Realistically, every 3-6 months is fine for a household of 2; monthly is wise if you wash pet bedding, kid clothes (small toys and crayons hide in pockets), or any home with frequent loose-coin pockets. Skipping it for 2+ years is what creates "no drain" calls.
Can I run my washer if it is not draining?
Briefly, only to test repairs. Do not run a real load — the next fill will overflow the tub onto your laundry-room floor. If you absolutely must finish a cycle, run only Drain or Drain & Spin, and bail standing water first.
How much does it cost to fix a washer that will not drain?
DIY parts: pump filter cleaning is free, a new drain pump is $45-90, a new drain hose is $20-35, and a new pressure switch is $30-60. With Axis on a typical LA/OC service call, expect $150-280 including parts. The $90 diagnostic fee applies toward the repair if you proceed.
Related Repair Guides
Washing Machine Not Spinning: How to Fix It
A washer that fills and agitates but won't spin is one of the most frequent calls our dispatch handles. In most cases the cause is an unbalanced load, a failed lid switch or door lock, a broken drive belt, or a worn motor coupling — and roughly two out of three of those you can fix yourself in under an hour.
Washing Machine Shaking and Vibrating: Causes and Fixes
A washer that shakes the laundry-room floor or 'walks' across it during the spin cycle is almost always a setup or balance issue, not a failed component. The four leading causes — uneven floor, forgotten shipping bolts, unbalanced loads, and worn shock absorbers — are all DIY-fixable, and most calls we run get resolved in well under an hour.
How to Clean a Washing Machine Drain Pump Filter
Cleaning your front-load washer's drain pump filter is one of the easiest and most effective maintenance tasks you can do. Grab some towels and a shallow dish, and let's clear out those trapped coins, lint, and bobby pins to get your washer draining perfectly again.